
Valentine’s Hearts Pavlova Wreath Recipe
One Valentine’s Day, I made individual heart-shaped pavlovas, and they were (and still are) incredibly cute. So I thought: “Why not make a Valentine’s pavlova wreath?”
Tah dahhhh! This will give any party of love or Galentine’s celebration a showstopping centerpiece (and a delicious one), while still being easy to share.
And baby girlllll ain’t she pretty??
I’m of the belief that most holidays deserve celebration and decoration, because why not?! Valentine’s is a holiday that I used to be miffed by, until I realized I can celebrate however and whenever I want.
So cheers to all the red and pink and heart-shaped explosions of love (for the people around you, your pets, and most importantly, yourself).
If you love this recipe, please rate and review it below and tag @accentgolden in your posts on social!
This website uses affiliate links, which may earn commission for purchases made at no additional cost to you.
VALENTINE’S PAVLOVA WREATH
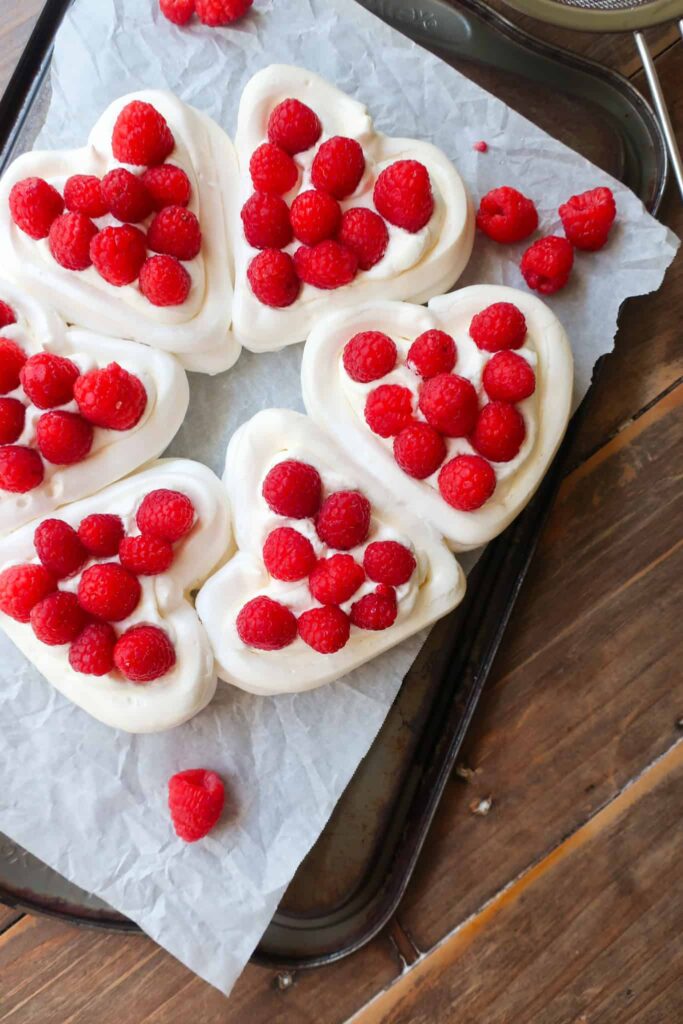
This pavlova is made up of French meringue, piped into six hearts to form a wreath. While the meringue is delicate, since you don’t want to knock out any excess air, it’s truly quite simple to whip up and fun to pipe into these cute hearts, no piping tip required!
Each basket is lovingly filled with a two-ingredient whipped cream and topped with fresh raspberries. As Queen Ina would say, how easy is that?
What is French meringue? French meringue is the most delicate of the three (French, Italian, and Swiss) since it needs to be baked to set. It’s made from egg whites, vinegar, cornstarch, granulated sugar, and powdered sugar, and baked until crunchy on the outside but chewy in the center.


INGREDIENTS
- Egg Whites: The key ingredient in a meringue, and honestly thrilling to whip up (I always feel like a scientist when I do)
- Cornstarch: Helps with the structure of your meringue to prevent it from weeping and keep it fluffy
- White Wine Vinegar: The acid in the vinegar works with the egg whites to help them whip up more easily and hold their shape better
- Granulated Sugar: Offers structure to your meringue
- Powdered Sugar: Blends more easily than the granulated sugar, ensuring a smoother finish to your bake while lightly sweetening the whipped cream
- Heavy Cream: The base for the whipped cream
- Raspberries: A bright red fruit, perfect for topping each heart-shaped basket in the pavlova wreath
What is pavlova? Utter bliss in a bite, in my opinion. Pavlova is a meringue-based dessert with a crisp outer shell and a soft, marshmallow-like center. Often filled with whipped cream and fresh fruit. It originated in New Zealand and Australia, often served during the holidays, and is traditionally made with French meringue (though Swiss meringue also works).
HOW TO MAKE A VALENTINE’S PAVLOVA WREATH
Preheat and Prepare the Heart Wreath Template
Preheat your oven to 212°F to ensure gentle baking for crisp, delicate pavlova.
Create a heart template by folding a 4-inch square of thick paper in half, drawing half a heart along the folded edge, cutting it out, and opening it to reveal a full heart shape. Use this cutout to trace six hearts evenly around an 8½-inch circle on parchment paper, leaving no more than ¼-inch between each heart.
Flip the paper over and place it on a baking tray.
Make the French Meringue
Add egg whites to a clean, spacious bowl and beat on low until frothy with no liquid remaining. Mix in vinegar and cornstarch, then beat until medium-soft peaks form, creating a slightly stiff but still workable meringue.
Gradually add granulated sugar a few spoonfuls at a time, beating until glossy, stiff peaks form. Sift in powdered sugar and gently fold it in with a metal spoon, taking care not to deflate the meringue.
Pipe the Valentine’s Pavlova Wreath
Transfer the meringue to a piping bag with a ¾-inch opening and pipe along the outlines of each heart, making sure the hearts touch. Fill in the bottoms of the hearts in one layer, then pipe two border rims to form the basket edges, avoiding more than two to prevent collapse during baking.
Bake the Pavlova
Place the meringue hearts on the middle oven rack and bake for 55 minutes. After baking, turn the oven off, crack the door slightly, and allow the meringues to cool completely for one hour to prevent cracking.
Prepare Whipped Cream
While the pavlovas cool, sift powdered sugar over the heavy cream in a bowl and whisk until thickened. Chill the whipped cream in the fridge until ready to assemble, being careful not to overwhip.
Assemble and Serve
Once the meringues are fully cooled, fill each heart basket with whipped cream and top with fresh raspberries. Serve immediately for a stunning, seasonal Valentine’s dessert.

3 reasons you’ll love this Valentine’s pavlova wreath
TIPS & VARIATIONS
- If you don’t have a full flat baking tray (aka there is no rim along the edge), flip your baking sheet over to ensure a flat surface for both baking and to easily slide your pavlova off of once it’s cooled
- When tracing your outline onto your parchment paper, use a thick marker like a Sharpie, since you will need to flip your parchment paper over. You don’t bake your meringue on the written side of the paper (we’re not trying to eat ink here)! Having a dark, thick outline will make it easier to trace with your piping bag
- Make sure the bowl you use to whip up your French meringue is completely clean, dry, and free of any fats. You can lightly dampen a towel with white vinegar and wipe down your bowl to ensure this. Any residue inside your bowl could prevent your meringue from properly forming.
- Your eggs should be at room temperature. A quick hack is to place your eggs (uncracked!) in a glass and cover them with hot water for 5 minutes. Then drain them before cracking and separating out the whites. Save your yolks for another recipe!
- Cut the tip off your bag to leave between a ½”-¾” opening. This will ensure that you’re piping a thick enough border for your hearts that they won’t collapse, but not too thick, where you won’t have enough to go around all of them
- Don’t pipe more than two layers above your base layer, to form your basket. If you pipe too many, the weight of meringue will force the heart to collapse in the oven
- Use a toothpick or spoon to very lightly smooth out any points (where you may have pulled up on the piping bag) around the rim of each basket. Do this very carefully so as to not disturb the air or structure of each heart. This is really just for aesthetics since how your meringue will bake exactly how it’s piped. AKA if you have some puffed-up points in your heart, it will baked with puffed-up points.
- Don’t overwhip your whipped cream! It should be fluffy but loose. If you whip it too much, it’ll begin to get grainy and taste greasy
- While you can just spoon your whipped cream into the baked meringue baskets, placing it in a piping bag will allow you to fill each while keeping the heart shape visible
- If fresh fruit isn’t in season, top your pavlovas with a quick compote. You can use fresh or frozen fruit for an easy cherry-berry compote, this peach and mint version, or a simple cranberry topping!
MAKING AHEAD & STORING
Pavlova is best the day it is made. You can’t make French meringue in advance, so you’ll have to be ready to bake this as soon as you whip up your meringue.
Once your meringue is baked and cooled, you can wrap it tightly (but gently) and fill it the next day. Just be sure to wrap it airtight if you plan to do this.
Fresh whipped cream can last in the fridge for up to a week if stored in an airtight container, which makes it easy to prep in advance once you’re ready to fill your pavlovas. Give it a few folds with a spatula before serving, since it may separate slightly in the fridge.
The baked, whipped cream-filled, and fruit-topped pavlova can last in the fridge in an airtight container for 2-3 days.
MORE VALENTINE’S DAY RECIPES
- Dark Chocolate S’mores Pavlova
- Chocolate Velvet Linzer Cookies
- Chocolate Oreo Cookies with Oreo Buttercream (Small Batch!)
- Chocolate Lava Cakes with Cherry Compote
EQUIPMENT YOU’LL NEED
- Digital Scale
- Mixing Bowls
- Mixer
- Measuring Cups
- Measuring Spoons
- 8 ½”-inch circle, for tracing
- Thick Paper
- Sharpie
- Scissors
- Piping Bag
- Spatulas
- Spoon
- Baking Sheet
- Parchment Paper
- Fine Mesh Sieve

Equipment
- Digital Scale
- Mixing Bowls
- Mixer
- Measuring Cups
- Measuring Spoons
- 1 Circle 8 1/2-inch wide for tracing
- Thick Paper
- Sharpie
- Scissors
- Piping Bag
- Spatulas
- Spoon
- Baking Sheet
- Parchment Paper
- Fine Mesh Sieve
Ingredients
- 100 g egg whites approx. 3 eggs, room temperature
- ½ tsp cornstarch
- 1 tsp white wine vinegar
- 100 g granulated sugar approx. ½ cup granulated sugar
- 100 g powdered sugar sifted
- ¾ cup heavy cream
- 2 ¾ tbsp powdered sugar a little over ¾ cup powdered sugar, sifted
- 12 ounces fresh raspberries
Instructions
- Preheat oven to 212°F
- To start, draw your heart wreath onto a piece of parchment paper. Take an 8 ½-inch plate or circle and place it onto a sheet of parchment paper, large enough to fit on your baking tray. Trace the circle onto the center of your parchment paper with a sharpie. Then, using a piece of paper (thicker is easier – like poster board) and cut out a 4-inch square. Fold the square in half and on the bent side, draw half of a heart, filling as much of the space as possible. Cut out the half of the heart, open it, and now you have your full heart shape! Using your cut-out heart, work around the circle to trace 6 hearts onto your parchment paper, leaving no more than ¼-inch of space inbetween. Flip your parchment paper over, sharpie side down, and place on your baking tray.
- For your meringue, add your egg whites to a clean bowl with space for growth
- With your mixer on low speed, beat your egg whites until nice and frothy, with no loose liquid at the bottom.
- Add in your vinegar and cornstarch and beat until medium-soft peaks form (aka the mixture has stiffened but not completely and it still moves around in the bowl).
- A few spoonfuls at a time, add your granulated sugar, beat, and repeat until all the sugar is added. You should have glossy, stiff peaks at this point. If you want to test your work, you can flip the bowl upside down and nothing should fall out.
- Sift in your powdered sugar and, using a metal spoon, gently fold in the sugar until just combined. Be very careful at this stage not to knock out any excess air from the meringue.
- Gently place your meringue into a piping bag and cut the tip off the bag, enough to give yourself about a ¾-inch opening
- On your parchment-lined baking tray, follow the outlines you have drawn to start piping your hearts to form a wreath. As you pipe, the outlines of each heart should touch the ones next to it. After you’ve piped the outlines, fill in the bottom of the heart in one layer. Next, following the edge of the heart, pipe the first outline of the basket. Repeat on top of that to form a second border. Be sure to pipe one rim right on top of the other, and don’t do more than two, as you will risk the weight being too heavy and the edges of the basket collapsing in the oven
- When all of your baskets are piped, place on the middle rack in the oven and bake for 55 minutes
- Turn your oven off but leave the baked meringues in the oven with the door slightly cracked. Allow them to cool completely in the oven for an hour. Allowing them to cool slowly with help prevent them from cracking
- While your meringue is cooling, make your whipped cream. Add your heavy cream to a bowl and sift your powdered sugar over it. Whisk together until the mixture has thickened to whipped cream. If done by hand, this will take a few minutes. Be careful not to overwhip and curdle your cream. Place your whipped cream in the fridge until you're ready to assemble your pavlovas.
- Once everything is cooled, add your whipped cream into each heart basket and top with raspberries!
- Enjoy immediately!


I made these today for lunch with friends and they turned out fantastically! I was a bit lazy and didn’t make your adorable heart shapes, but more like bird nests. Anyway they were a hit! Also, I’d like to note that I made and baked the merengue yesterday and stored them in a tight plastic container at room temperature so I only had to add the whipped cream and fruit just before serving. Thanks for the great recipe Hannah!
Yes! These work great to store a day ahead airtight, to make it easy for topping and serving the next day! So glad you and your friends enjoyed!