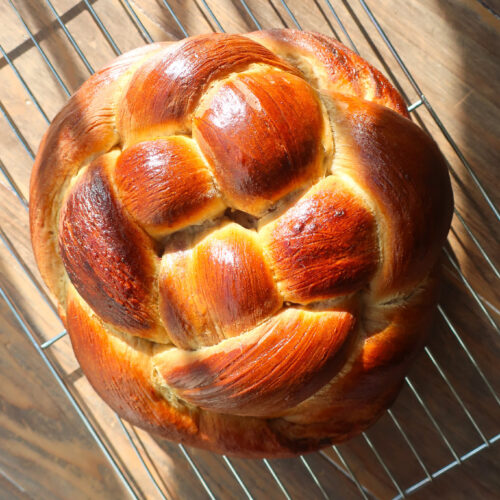
This spiced challah bread is soft, lightly sweet, and braided with a fragrant date filling. A beautiful, tender bake perfect for holidays or cozy weekends.
Equipment
- Standing mixer with a dough hook
- Dough Scraper
- Pot
- Digital Scale
- Parchment Paper
- Baking Tray
Ingredients
DOUGH
- 128 g warm water no more than 98.6F
- 6 g dry yeast
- 80 g beaten egg plus a little extra in a separate dish for brushing your dough before baking
- 64 g canola oil
- 68 g honey
- 400 g bread flour
- 8 g salt
- 1 tsp ground cinnamon
- 1 tsp ground cardamom
FILLING
- 100 g dates chopped
- ½ tsp cinnamon
- ½ tsp cardamom
- ½ cup water
Instructions
- Start by making your dough. In a mixing bowl fitted with a dough hook, combine your warm water and yeast and leave to sit for five minutes to allow it to bloom
- In a pitcher, combine your beaten egg, canola oil, and honey and give a good mix. Pour half of the mixture into the mixing bowl with the yeast/water
- Add flour to the mixing bowl and set to the lowest speed
- Once mostly combined, add the remainder of your honey mixture to the mixing bowl
- When the dough starts to look like pancake batter, increase the speed to medium for five minutes
- Scrape down the bowl and put up to the next highest speed. Mix until the dough is clinging to the hook and basically cleaning the bowl
- If you need to, scrape the bowl down a final time and mix briefly to bring any remaining pieces together
- On low speed, add your salt, cardamom, and cinnamon, and mix until combined
- Scrape down the bowl and then cover with a towel, leave to rest until doubled in size. Depending on the warmth of your home, this should take about an hour
- While your dough is rising, make the filling. Place all ingredients into a pot and bring to a simmer over medium-high heat. Reduce the heat to low and simmer for 7-10 minutes, stirring regularly, until there is no visible liquid on the bottom of the pot. As the dates soften, squish them down with a spoon. Remove from the heat and mash any remaining chunks into a paste. Set aside to cool
- If you're not sure if your dough has risen enough, press your finger gently into the dough. When the indent you made releases slowly, it’s ready!
- Weigh your dough on a digital scale and then use a dough scraper to cut your dough into four even pieces. Cut from other pieces as needed until all come to an equal weight. Do not tear or pull your dough to do this
- Take each of the four pieces and degas them one by one, flattening them lightly into a rectangle and removing some of that excess air
- Place a thick line of your cooled date filling evenly across the four squares, about ⅓ of the way up. Then roll the top of the dough over the filling, press in with your fingers to seal, and roll the rest of the way down, pressing in again. Make sure to pull in the edges of the dough as well, to seal in the filling
- Lightly flour your work surface as needed, so the dough doesn't tear, and gently roll out each piece of dough to just under 2ft long. Taper the ends so they are slightly pointed
- To form your knot, cover your baking tray with parchment paper and shape directly on it. Lay two of the logs vertically with only 1/2-inch of space in between. Making sure they are perfectly parallel to each other. Then place the other two horizontally over the vertical dough logs, across the center. Weave the top horizontal log so it goes over the first vertical log and under the second. Then place the second horizontal log below the first with only 1/2-inch of space between. This second log should go under the first vertical log and over the second one. You should now have the start of your knot. Then, working strand by strand, find a strand that is currently under another, and bring it over its neighbor, work clockwise until you’ve placed all of the four “under” strands over. Then, going counterclockwise, repeat, since you now have new strands that are under, and place them over their neighbor.
- Once you’ve made your knot, tuck your ends under and then use your dough scraper to gently swoop in the bottom for a smooth knot. Cover and proof until doubled in size, about another hour
- Preheat your oven to 365°F
- Brush your challah knot with some beaten egg, be careful not to let the brush pull at the dough
- Bake on the third shelf down in your oven for 25-35 minutes. To check if your bread is cooked, insert a digital thermometer into the middle hole of the dough - probing through the middle crack, don’t poke through one of your pretty knot lines. The temperature should be between 188°F - 194°F, I like to check a few sections of the loaf to be sure
- Remove from oven and place on a wire rack to cool completely before slicing.
- Enjoy!
Notes
*There are tons of YouTube videos on how to braid challah. I’d recommend watching a few to determine which style you want to do, as it’ll probably help more than reading my written knotting instructions above
*This recipe has been minimally adapted from a recipe I received from Chef Ashley during my patisserie course in Scotland.
