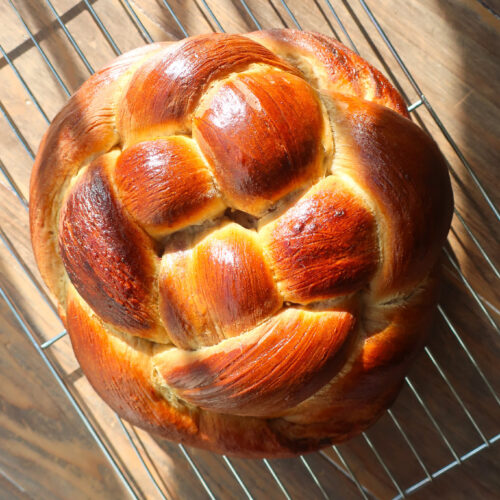
Spiced Challah Bread with Dates
Challah at yo girlllll. Make sure you shout that aloud; it works better. If you love a slightly sweet, soft bread (and, I mean, who doesn’t), then you’re in for a real treat with this spiced challah bread.
When I was in pastry school, there was another student who was big on cardamom, and to be honest, it wasn’t a spice heavily in my repertoire. After a few occasions of smelling it on her bakes, I decided to try it in my bread and, well, I’m now in love. Thanks, Sophie!
This bread is a deliciously soft treat, turned into cinnamon toast, or even a yummy French toast! Set aside a few hours (remember bread loves time to sit and grow, don’t we all?) and get to making this delicious knotted loaf.
If you love this recipe, please rate and review it below and tag @accentgolden in your posts on social!
This website uses affiliate links, which may earn commission for purchases made at no additional cost to you.
SPICED CHALLAH BREAD
Cinnamon and cardamom are the spice queens we’re using to provide key flavor to this challah bread. If you didn’t know, challah is an enriched dough, meaning it’s made with fats and sugars to make it even softer and more flavorful.
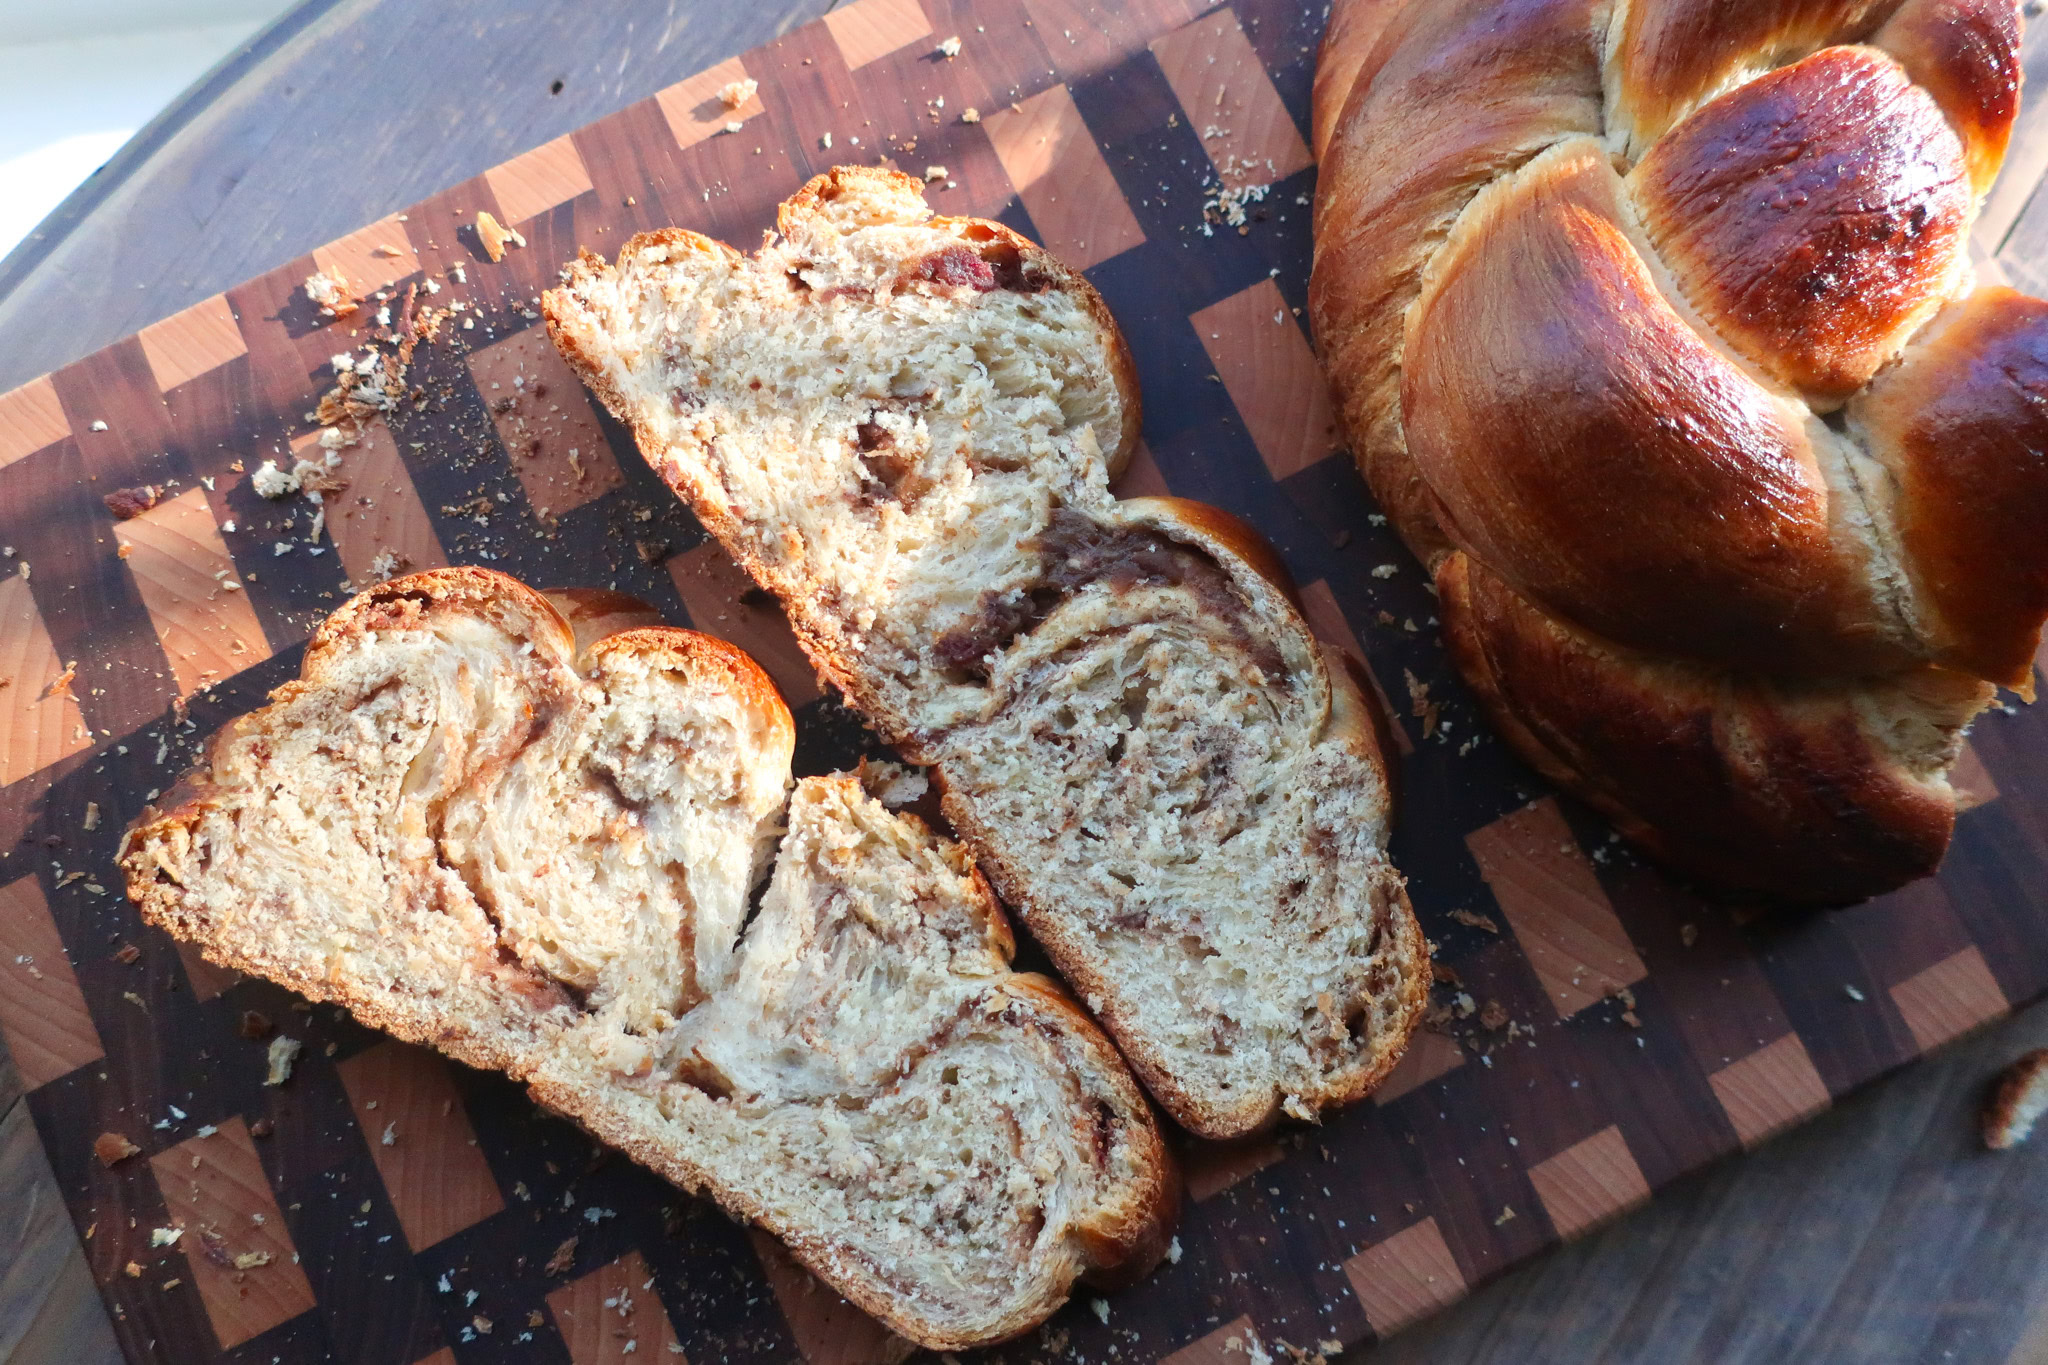
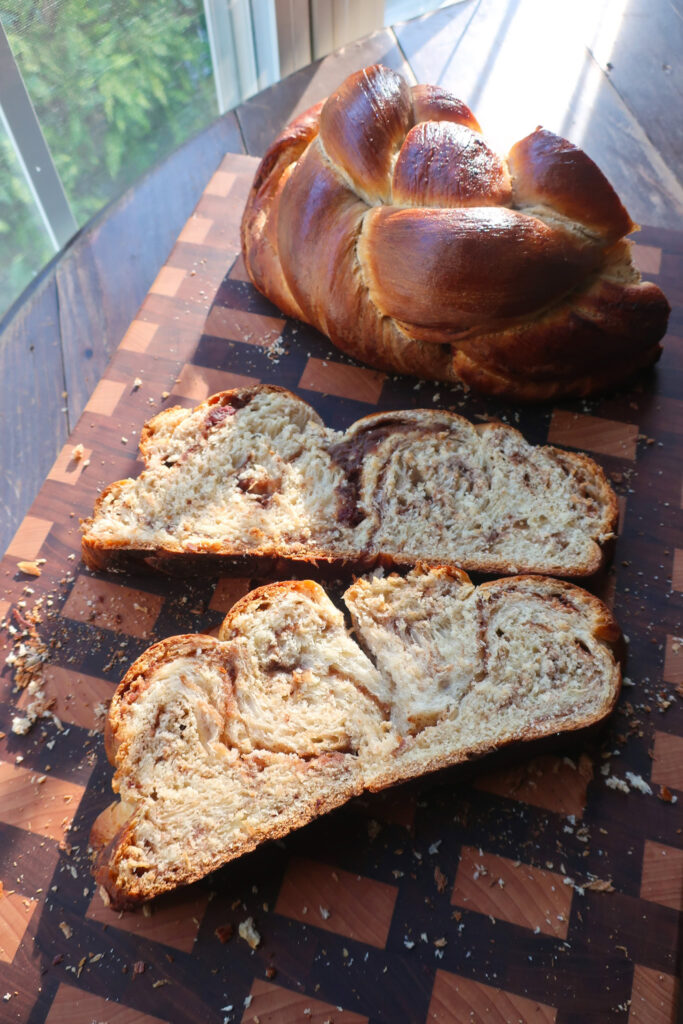
You can twist and shape a challah loaf in many ways, for this execution we’re using the knot (cause I think it’s real purdy). Before branding, each strand is filled with a spiced date paste, for added sweetness and a pretty swirl.
How do I know if my yeast is good? When you add yeast to warm water, it should bloom and become frothy. If this does not happen, and you see no change in your yeast after 5-10 minutes, it’s likely expired and should be replaced before baking.
INGREDIENTS
- Warm water: Activates the yeast and hydrates the dough.
- Dry yeast: Leavens the dough and gives the challah its soft, airy texture.
- Eggs: Enrich the dough for tenderness and structure and create a glossy finish when brushed on before baking.
- Canola oil: Keeps the challah moist and tender with a soft crumb.
- Honey: Sweetens the dough while feeding the yeast and aiding browning.
- Bread flour: Provides higher protein for strength, structure, and a chewy crumb.
- Salt: Enhances flavor and regulates yeast activity.
- Cinnamon & Cardamom: Add warm spice throughout the dough
- Dates: Add natural sweetness and a soft filling.
Can I substitute all-purpose flour for bread flour? Not in this recipe. Bread flour has more protein, which helps the dough develop enough strength to support the date filling and maintain the braided knot without spreading or losing its shape.
HOW TO MAKE SPICED CHALLAH BREAD
In the bowl of a stand mixer fitted with a dough hook, combine the warm water and yeast and let it sit for about five minutes until foamy. This step activates the yeast and ensures proper rise for the challah dough.
In a separate pitcher, mix together the beaten egg, canola oil, and honey until well combined. Pour half of this mixture into the bowl with the yeast and water.
Add the bread flour to the mixing bowl and mix on the lowest speed until a rough dough begins to form. Slowly pour in the remaining honey mixture as the dough comes together.
Once the dough resembles a thick pancake batter, increase the mixer speed to medium and knead for five minutes. This develops gluten and begins strengthening the dough.
Scrape down the bowl, then increase the mixer to the next highest speed and continue kneading until the dough clings to the hook and cleans the sides of the bowl. If needed, scrape the bowl once more and mix briefly to incorporate any remaining bits.
Reduce the mixer to low speed and add the salt, ground cinnamon, and ground cardamom. Mix just until the spices are fully incorporated.
Scrape down the bowl, cover it with a towel, and let the dough rise in a warm place until doubled in size. Proper fermentation at this stage ensures a soft, flavorful challah.
While the dough rises, prepare the date filling by placing the dates, cinnamon, cardamom, and water into a saucepan. Bring to a simmer over medium-high heat before reducing and cooking on low, mashing the dates as they soften, until no liquid remains and a thick paste forms.
Remove the filling from the heat and set aside to cool completely. Cooling prevents the filling from melting into the dough during shaping.
To check if the dough is ready, gently press a finger into the surface and watch for the indent to slowly spring back. This indicates the dough is properly proofed.
Weigh the dough using a digital scale and divide the total weight evenly into four portions. Cut the dough using a bench scraper, adjusting pieces until all portions weigh the same without tearing the dough.
Flatten each dough portion gently into a rectangle, pressing out excess air without fully degassing. This creates an even base for filling and shaping.
Spread a thick line of date filling across each rectangle about one-third of the way up. Fold the dough over the filling, seal with your fingers, roll tightly, and pinch the edges to fully enclose the filling.
Roll each filled piece into a rope just under two feet long, tapering the ends slightly. Lightly flour the surface as needed to prevent sticking or tearing.
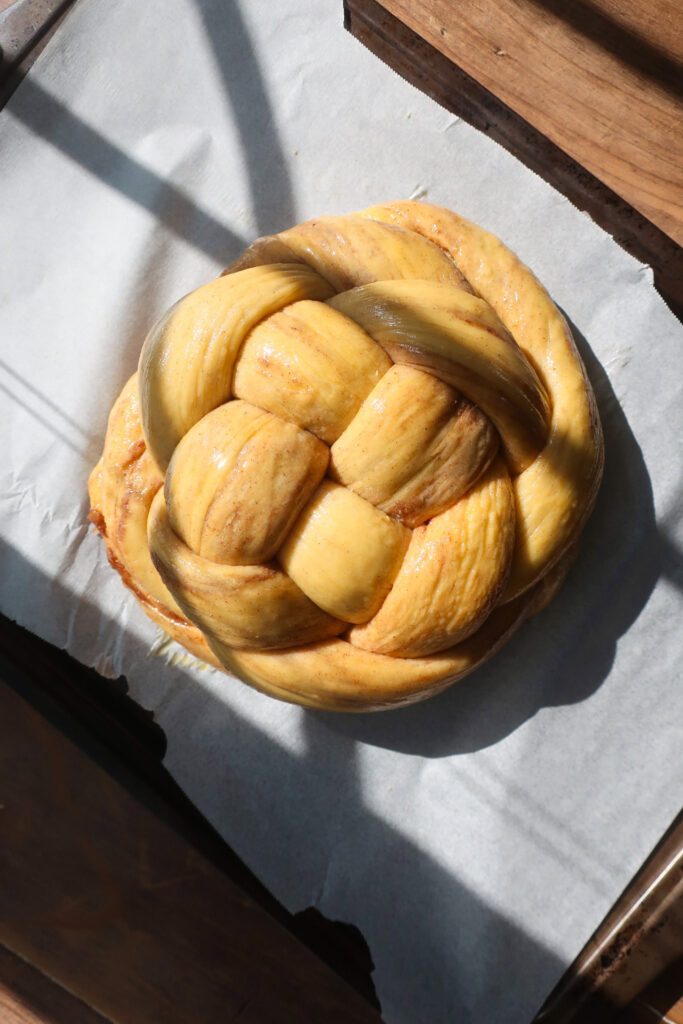
Line a baking sheet with parchment paper and shape the challah knot directly on the tray. Arrange two dough ropes vertically, then weave the remaining two horizontally in an over-under pattern to form the knot.
Continue weaving strand by strand, alternating directions until all under strands have been brought over. Tuck the ends underneath and gently round the knot for a smooth, even shape.
Cover the shaped challah and proof again until doubled in size. This second rise ensures a light, airy crumb after baking.
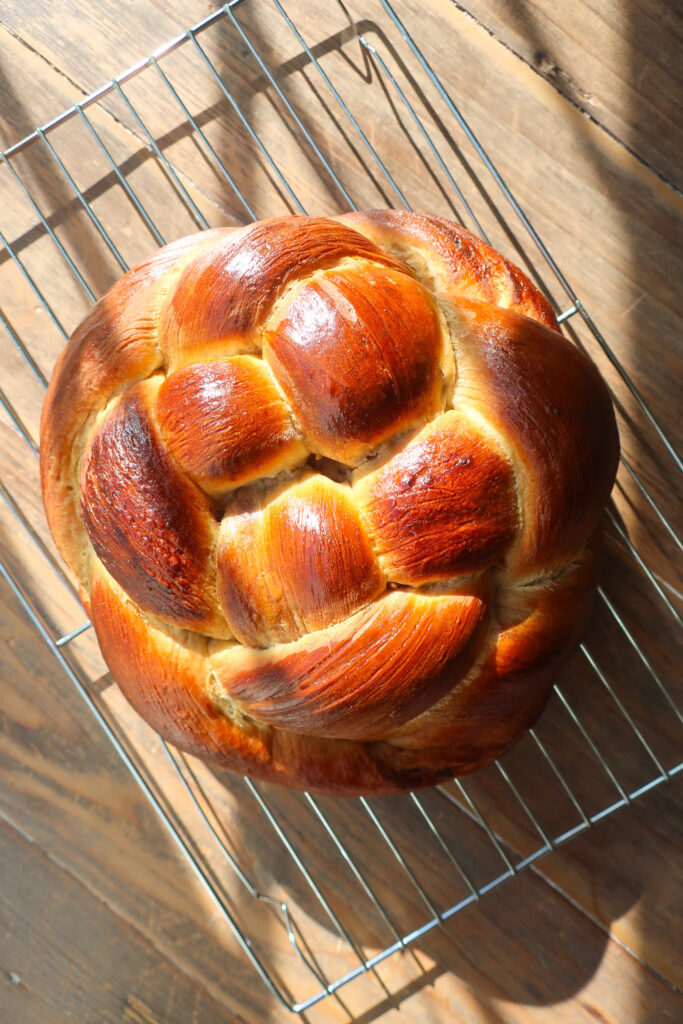
Preheat the oven to 365°F when the dough is almost done proofing. Brush the challah gently with beaten egg, taking care not to deflate the dough.
Bake on the third rack from the top for 25 to 35 minutes until the internal temperature reads between 188–194°F when tested in the center of the loaf. I like to test a few spots.
Remove the challah from the oven and transfer it to a wire rack. Allow it to cool completely before slicing for the best texture and clean cuts.
3 reasons you’ll love this bread
TIPS & VARIATIONS
- When blooming your yeast, make sure your water is warm but not hot or the heat will kill the yeast. It should be just warm enough you almost don’t feel it running over your finger when you test it.
- Bread flour is essential to the structure and final texture of this spiced challah bread. You cannot substitute for all purpose in this recipe.
- For a citrusy twist, omit the 1/2 cup of water in the date filling and add the juice and zest of an orange. If needed, you can add extra water just enough to cover the dates in the post
- Don’t rush your dough as it rises. Proper proofing ensures a soft and flavorful challah.
- The filling needs to be completely cooled before it’s spread onto the dough, so it doesn’t melt into the bread. Also, make sure to properly seal the bread dough around the filling to ensure it doesn’t leak while baking.
- Use a digital thermometer to check the bread for doneness before removing from the oven. Insert the prong into the center of the dough (between the braids to avoid making a hole). Once it reads between 188–194°F it’s properly cooked and ready to cool.
STORING SPICED CHALLAH BREAD
Once baked and cooled, your challah can be stored in an airtight container at room temperature for up to 3 days.
Personally, I like to cut it into slices before placing it into a freezer-safe bag, where it will keep frozen for up to 2 months. Simply pull out a slice and pop it into the toaster to reheat.
MORE COZY SPICED RECIPES
- Homemade Apple Butter
- Easy Snickerdoodle Shortbread
- Spiced Sweet Potato Bread
- Pumpkin Cake with Cream Cheese Frosting
- Apple Cinnamon Scones
- Cinnamon Olive Oil Cake with Salted Vanilla Glaze
EQUIPMENT YOU’LL NEED
- Standing Mixer (w/ Dough Hook Attachment)
- Dough Scraper
- Pot
- Digital Scale
- Parchment Paper
- Baking Tray
Equipment
- Standing mixer with a dough hook
- Dough Scraper
- Pot
- Digital Scale
- Parchment Paper
- Baking Tray
Ingredients
- 128 g warm water no more than 98.6F
- 6 g dry yeast
- 80 g beaten egg plus a little extra in a separate dish for brushing your dough before baking
- 64 g canola oil
- 68 g honey
- 400 g bread flour
- 8 g salt
- 1 tsp ground cinnamon
- 1 tsp ground cardamom
- 100 g dates chopped
- ½ tsp cinnamon
- ½ tsp cardamom
- ½ cup water
Instructions
- Start by making your dough. In a mixing bowl fitted with a dough hook, combine your warm water and yeast and leave to sit for five minutes to allow it to bloom
- In a pitcher, combine your beaten egg, canola oil, and honey and give a good mix. Pour half of the mixture into the mixing bowl with the yeast/water
- Add flour to the mixing bowl and set to the lowest speed
- Once mostly combined, add the remainder of your honey mixture to the mixing bowl
- When the dough starts to look like pancake batter, increase the speed to medium for five minutes
- Scrape down the bowl and put up to the next highest speed. Mix until the dough is clinging to the hook and basically cleaning the bowl
- If you need to, scrape the bowl down a final time and mix briefly to bring any remaining pieces together
- On low speed, add your salt, cardamom, and cinnamon, and mix until combined
- Scrape down the bowl and then cover with a towel, leave to rest until doubled in size. Depending on the warmth of your home, this should take about an hour
- While your dough is rising, make the filling. Place all ingredients into a pot and bring to a simmer over medium-high heat. Reduce the heat to low and simmer for 7-10 minutes, stirring regularly, until there is no visible liquid on the bottom of the pot. As the dates soften, squish them down with a spoon. Remove from the heat and mash any remaining chunks into a paste. Set aside to cool
- If you're not sure if your dough has risen enough, press your finger gently into the dough. When the indent you made releases slowly, it’s ready!
- Weigh your dough on a digital scale and then use a dough scraper to cut your dough into four even pieces. Cut from other pieces as needed until all come to an equal weight. Do not tear or pull your dough to do this
- Take each of the four pieces and degas them one by one, flattening them lightly into a rectangle and removing some of that excess air
- Place a thick line of your cooled date filling evenly across the four squares, about ⅓ of the way up. Then roll the top of the dough over the filling, press in with your fingers to seal, and roll the rest of the way down, pressing in again. Make sure to pull in the edges of the dough as well, to seal in the filling
- Lightly flour your work surface as needed, so the dough doesn't tear, and gently roll out each piece of dough to just under 2ft long. Taper the ends so they are slightly pointed
- To form your knot, cover your baking tray with parchment paper and shape directly on it. Lay two of the logs vertically with only 1/2-inch of space in between. Making sure they are perfectly parallel to each other. Then place the other two horizontally over the vertical dough logs, across the center. Weave the top horizontal log so it goes over the first vertical log and under the second. Then place the second horizontal log below the first with only 1/2-inch of space between. This second log should go under the first vertical log and over the second one. You should now have the start of your knot. Then, working strand by strand, find a strand that is currently under another, and bring it over its neighbor, work clockwise until you’ve placed all of the four “under” strands over. Then, going counterclockwise, repeat, since you now have new strands that are under, and place them over their neighbor.
- Once you’ve made your knot, tuck your ends under and then use your dough scraper to gently swoop in the bottom for a smooth knot. Cover and proof until doubled in size, about another hour
- Preheat your oven to 365°F
- Brush your challah knot with some beaten egg, be careful not to let the brush pull at the dough
- Bake on the third shelf down in your oven for 25-35 minutes. To check if your bread is cooked, insert a digital thermometer into the middle hole of the dough – probing through the middle crack, don’t poke through one of your pretty knot lines. The temperature should be between 188°F – 194°F, I like to check a few sections of the loaf to be sure
- Remove from oven and place on a wire rack to cool completely before slicing.
- Enjoy!

Delicious! Love the flavor and texture!