
Easy Cinnamon Roll Pie with Cream Cheese Filling
I love a cinnamon roll. If there is one thing I’m usually craving, it’s a cinnamon sugar situation – most often quickly resolved with toast. But if I can get my hands on a fluffy cinnamon roll or this Cinnamon Sugar Sweet Potato Pull-Apart Bread, man, life is golden.
That being said, I also love pie. I mean, there are few baked goods that I don’t like, but there are some that I loveeee, and pie and cinnamon bakes fall into the latter category. Anyway, I thought: how can I combine the two but also make it a little quicker? So here we are, with a deliciously warm and easy cinnamon roll pie, baked with a cream cheese filling, and topped with the sweet icing.
WHAT IS CINNAMON ROLL PIE?
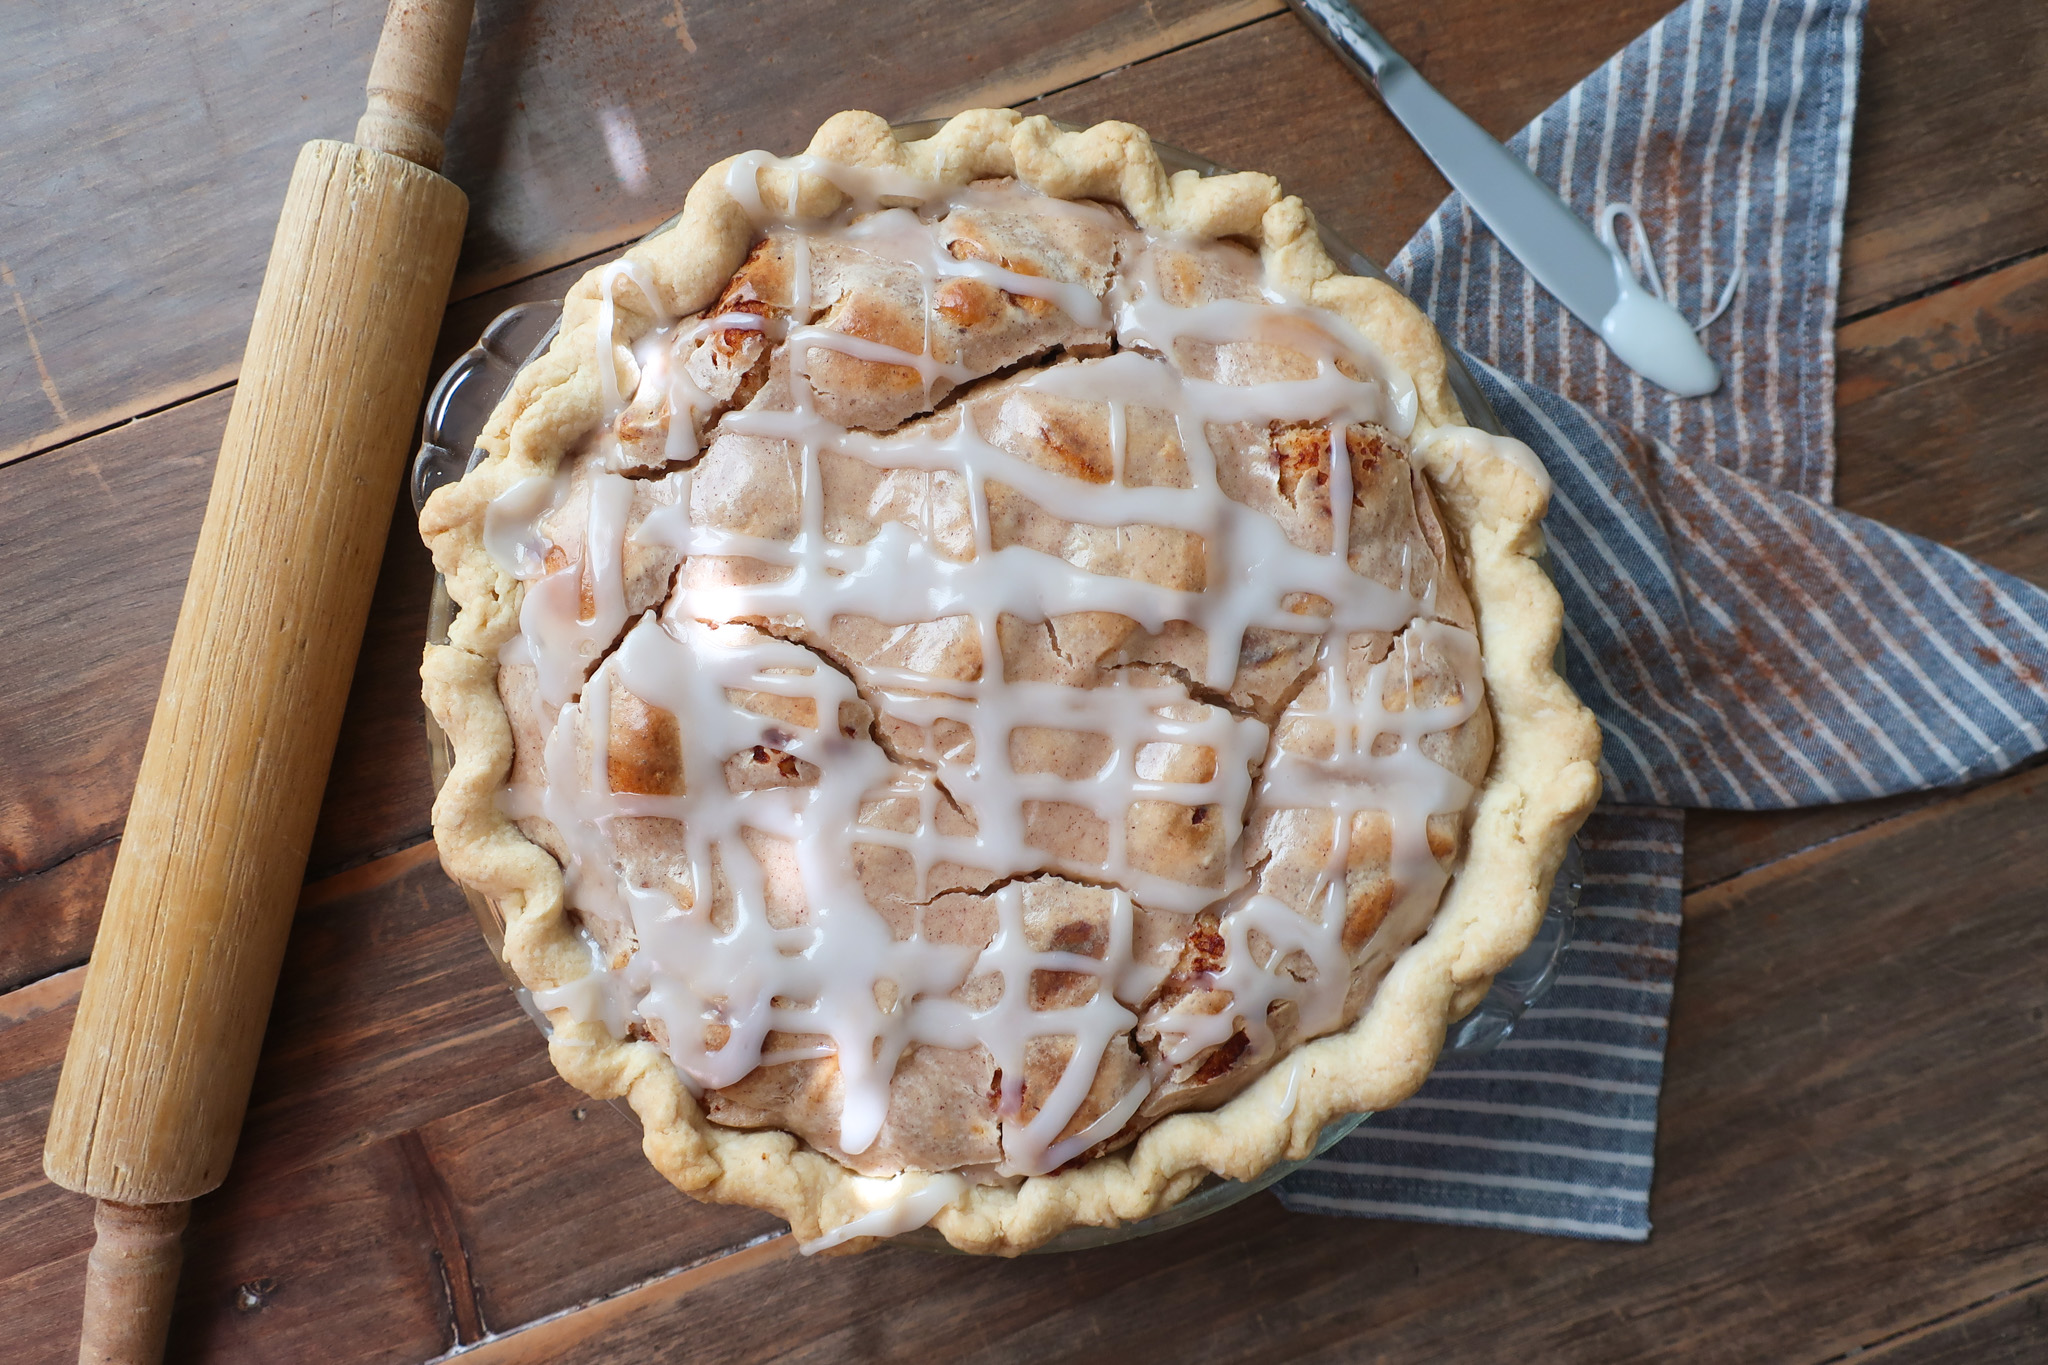
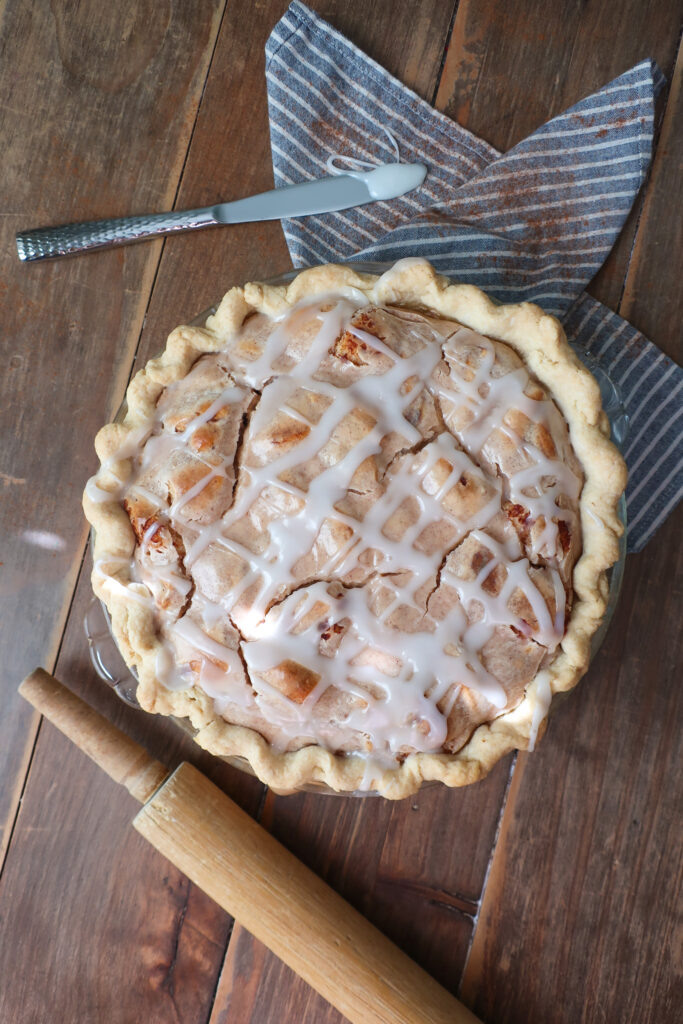
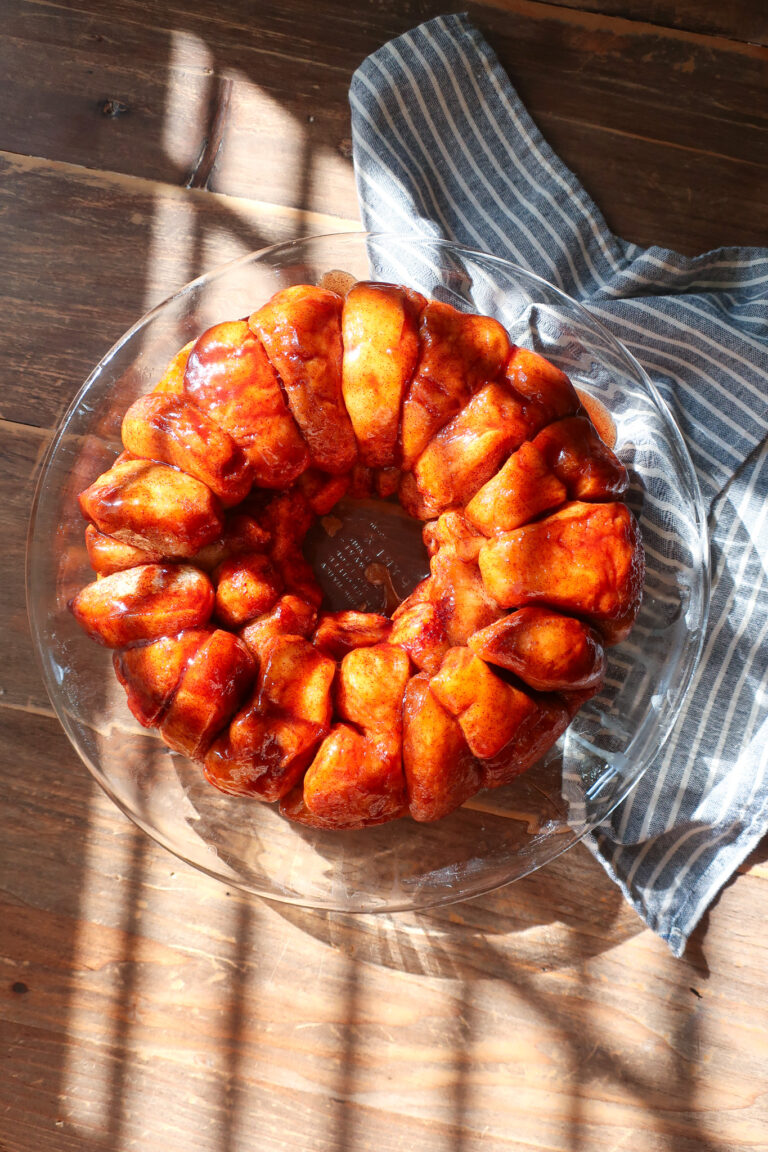
You start with a traditional pie crust base, the one I use below is my go-to for sweet and savory pies as it pairs well with a variety of fillings. To make this pie even easier, we’re using canned cinnamon rolls! I have no hate for the canned variety and cutting them into pieces to use for our cinnamon roll layer makes this pie so simple and delicious (two of my favorite combos). The cinnamon rolls are covered with a cream cheese filling, that will bake with your pie and form a sort of top “crust,” though soft and gooey when you bite into it. Lastly, we use the icing from the cinnamon roll containers and heavily drizzle that over top of our baked and warm pie, saving extra for anyone who wants even more on their individual slices.
Can I use storebought pie crust? You absolutely can! I prefer a homemade crust but totally understand that if you’re on a time pinch, or simply don’t feel like rolling out the dough, storebought is a great alternative.
INGREDIENTS
- Flour: The binding ingredient for your easy homemade pie crust
- Salt: A little goes a long way to bring out those flaky pie crust flavors
- Unsalted Butter: Gives both a delicious buttery flavor to your pie and the best kind of flake
- Water: Cold and just a little to help form your pie dough
- Refrigerated Unbaked Cinnamon Rolls (with icing): Grab your favorite ones, slice, and add to your pie crust. Make sure to get ones with icing, as we’ll use it to drizzle over the top of our warm pie
- Cream Cheese: A classic requirement in a cinnamon roll pairing
- Powdered Sugar: Balances the tang of the cream cheese with a little sweet
- Vanilla Extract: Just a touch to bring out a pop of flavor
- Sour Cream: We want this filling creamy without being too runny, and sour cream does the trick
- Brown Sugar: A little sweetness with that cozy molasses flavor
- Cinnamon: Because we want this pie packed with all the cinnamon flavor of course!
How will I know when my pie is done? Since we’re baking the cinnamon rolls between pie crust and cream cheese filling, it’s important to not take the pie out too soon (thinking it’s ready before it is). You’ll notice the pie puff as it bakes, showing that the cinnamon rolls are rising as they cook, and the top of the filling will start to brown slightly. This will start to happen before your pie is ready so don’t be fooled! Cook your pie for the full hour, as detailed below, but to be even more sure your cinnamon rolls are baked in the middle, you can insert a digital thermometer into the center of the pie, at a slight angle, to poke through one of the cinnamon rolls – once it reads 160F you’re good to remove your pie from the oven!
HOW TO MAKE CINNAMON ROLL PIE
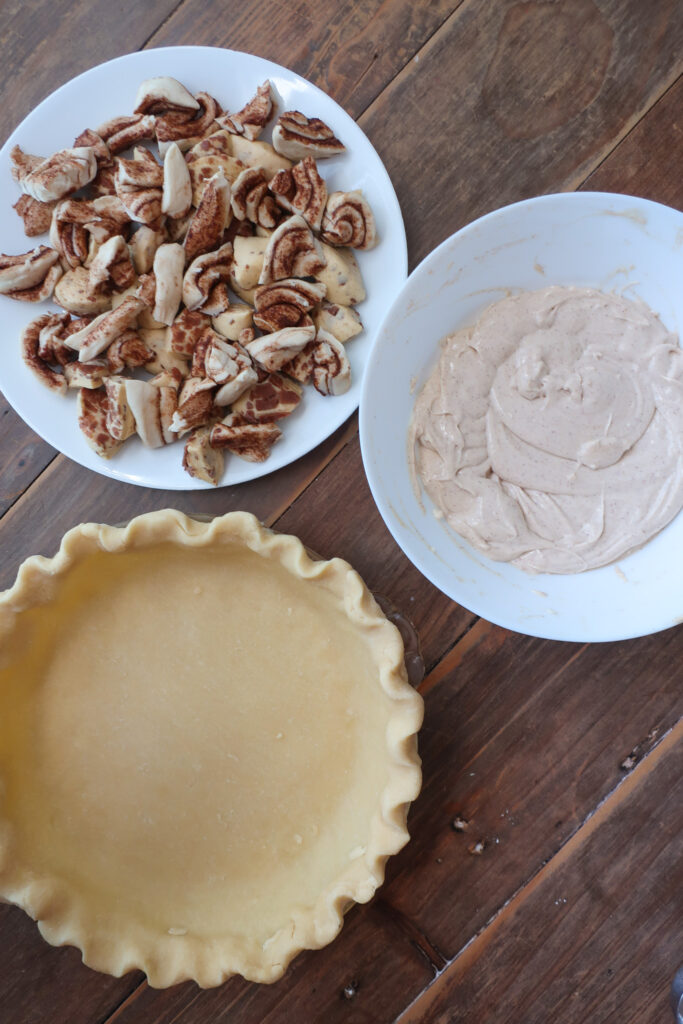
After you’ve lightly greased your pie dish – I like to give a few sprays of canola oil and then wipe it into all the nooks and crannies with a paper towel – you’ll prep your pie dough. If using a storebought crust, skip the dough prep and go ahead and lay your dough into your dish, crimp the edges, and pop into the fridge. For the homemade crust, grab a bowl and stir together your flour and salt. Using two butter knives, held against each other with one in each hand to form an “X,” cut your butter into your dough, with the knives pulling away from each other and back in, until you have a sand-like consistency. You can also do this in a large food processor if you have one. Place a few ice cubes in a glass and fill it with water, to make sure it’s extra cold, before measuring your water into your dough. Cut it into your dry mixture and then compress your dough into a ball.
To roll out your dough, place it between two large pieces of parchment paper and roll to a ⅛” thickness. You want to make sure your dough has an even thickness throughout, so keep an eye on where you need to roll, as you’re rolling it out since you want it to bake evenly! Carefully peel the top layer of your parchment paper off your rolled dough, then lay it back on – briefly smoothing to lightly stick it – and flip your dough over. Peel off the other layer of parchment paper, set to the side, and carefully flip your dough into your greased pie dish. Peel the parchment off the top and slowly, working around the sides, adjust the dough so it’s laying evenly in the pan, along the bottom and sides. Take your edges and flip the under to begin forming the rim of your crust. Make a peace sign with your pointer and middle fingers on one hand, and place it along the edge of your crust. With the pointer finger of your other hand, pointing toward the center of the peace sign, pull back the dough in the center of your fingers. This will form a crimp. Repeat along the edge of your crust until complete. Pop this into the fridge for 15 minutes to chill the dough (and all that yummy butter within) ahead of baking.
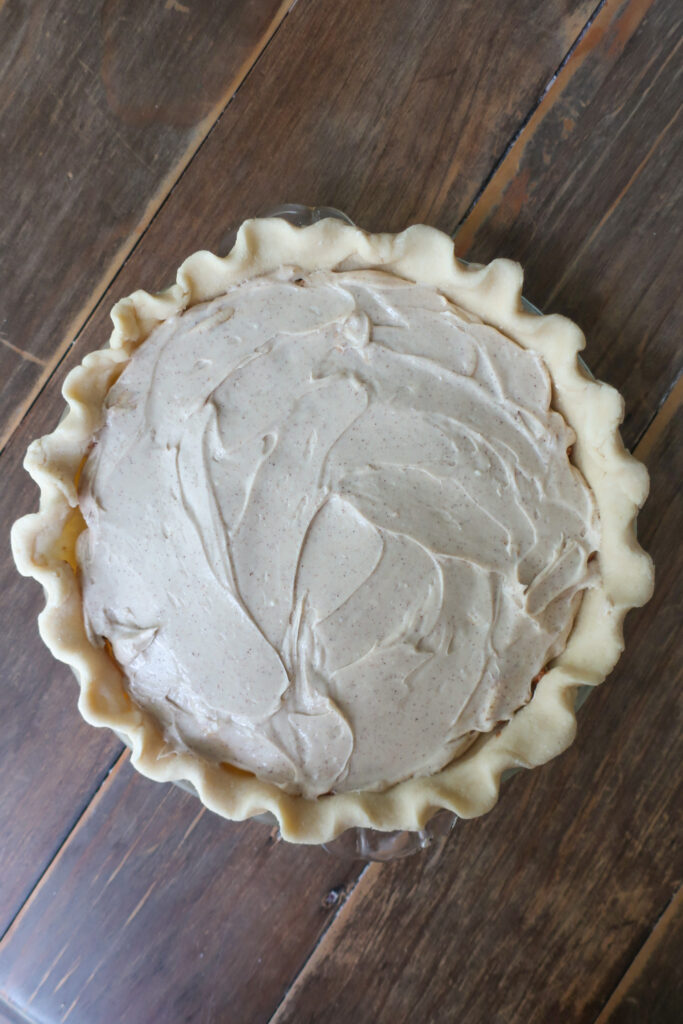
Preheat your oven to 375F. Now it’s time to quickly make the cream cheese filling! In a bowl sift your powdered sugar over your cream cheese and beat together. Add in your vanilla extract, sour cream, brown sugar, and cinnamon and beat until smooth. You’ll have a creamy, flavorful filling for your pie now!
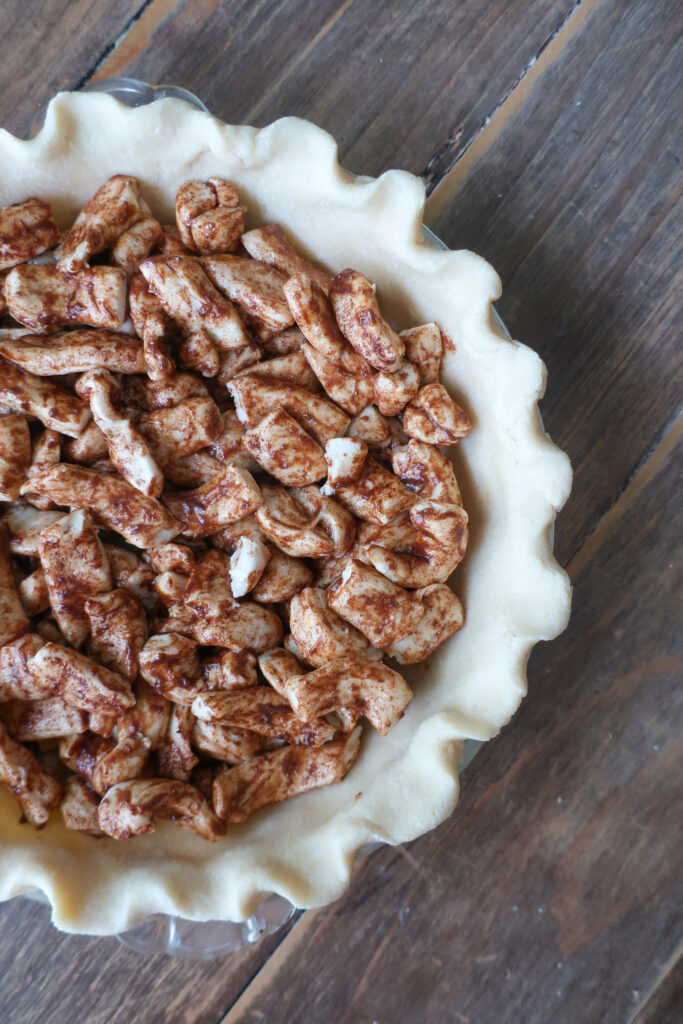
Remove your cinnamon rolls from their cans, setting the icing to the side for later. Stack a few cinnamon rolls on top of each other and quarter (slicing into four pieces). Remove your pie dish from the fridge and layer the pieces of all of your rolls evenly across the base of your crust. Then pour your cream cheese filling over your cinnamon rolls and spread evenly with a spatula, for a smooth top layer.
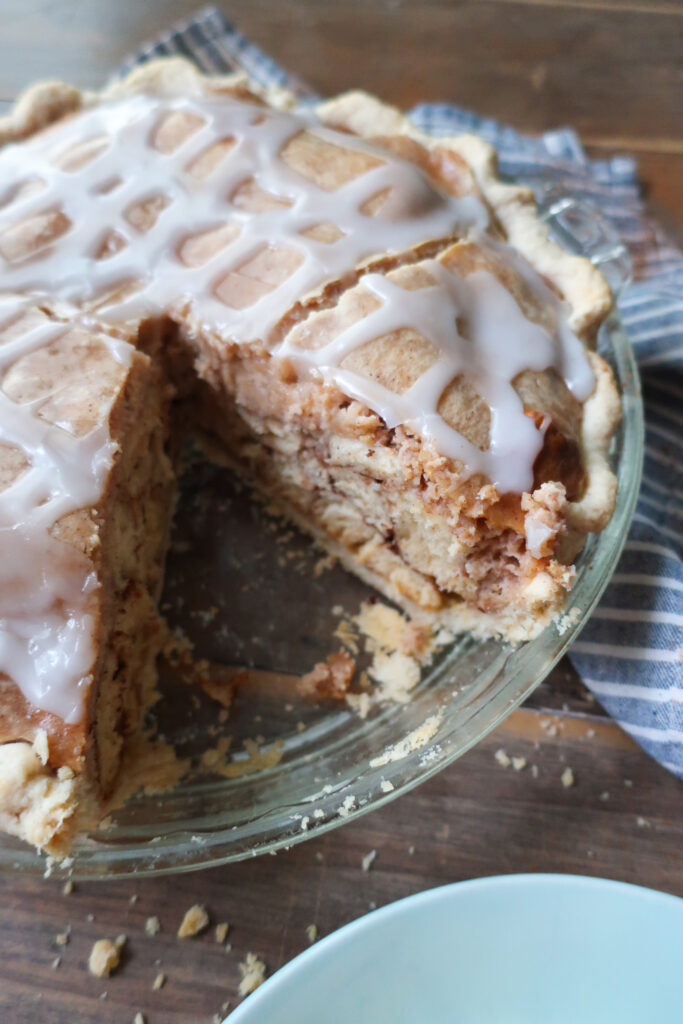
Pop your pie into the oven and bake at 375F for 10 minutes. Then, without opening the oven, drop the temperature to 325F and bake for an additional 50 minutes. Your pie will be puffed and the filling should appear dry and slightly cracked. There will be a little browning as your cinnamon roll pieces rise in the oven, don’t worry! To check, you can use a digital thermometer inserted into the middle of your pie (pressing into one of the cinnamon roll pieces) and check for an internal temperature of at least 160F, this will ensure the dough has been fully cooked.
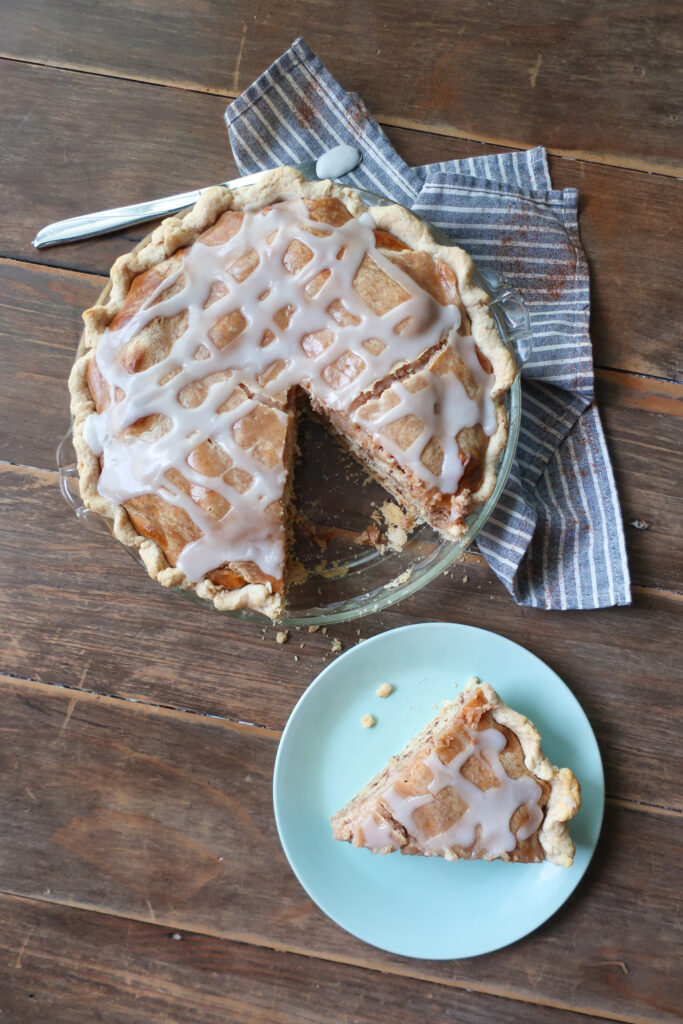
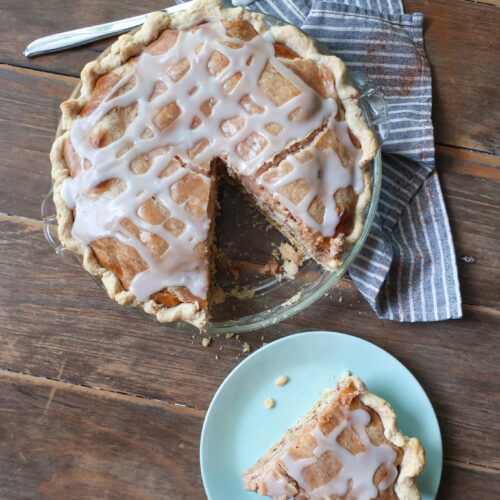
Once your pie is baked, remove it from the oven and allow it to cool for 10 minutes before liberally drizzling with the icing you set aside from the cinnamon roll containers. Slice and enjoy warm!
3 reasons you’ll love this pie
TIPS & VARIATIONS
- You can use any storebought cinnamon rolls that you prefer, just make sure they are unbaked (we will bake them in the crust) and come with icing, which you will top your pie with! I love Pillsbury and Aldi’s canned cinnamon rolls.
- When adding water to your homemade pie crust, drop a few ice cubes in a glass of water before measuring. This will keep your crust cool as you bring it together!
- I always prefer a homemade pie crust, they’re simply better, but if you don’t have the few extra minutes or don’t feel like rolling out the dough, you can use a storebought crust. Just make sure it’s big enough to fit into a 10-inch pie dish!
- Just cut each of your cinnamon rolls into quarters – I stacked a few on top of each other to cut them faster. You want them in pieces so they bake together like a delicious puzzle but you still want good chunks of each roll in every bite.
- I highly recommend using a digital thermometer to check forthe doneness of your pie. Between the cinnamon rolls needing to bake fully and the cream cheese filling that covers them, the best way to know that your cinnamon rolls are fully cooked is to check for doneness with a thermometer. It should read 160F when it’s time to take out your pie. Just be careful not to overbake! You want soft and fluffy rolls in your pie.
MAKING AHEAD & STORING
- You can make your pie crust in advance! Once you’ve made the dough and shaped it in your pie dish, carefully wrap it and store it in the fridge for up to 3 days. You can also wrap the dough without rolling, just flatten your ball slightly into a disc, wrap it, and refrigerate it. Note that I find it easier to roll the dough as you’re originally working with it. Additionally, the dough can be frozen in a pie dish or tightly wrapped, unrolled for up to 3 months. It will need to be thawed in the fridge overnight or up to 24 hours before using for your pie.
- Since the filling in this pie has cream cheese, it should be stored in the refrigerator. The pie will last in the fridge for two to three days, for optimal freshness.
- If you don’t finish the pie when it’s warm from the oven, reheat a slice for 10-15 seconds in the microwave to get that soft and warm cinnamon roll vibe
MORE CINNAMON RECIPES
These Cinnamon Chip Scones are basically cinnamon rolls in scone form, so if you’re also on the cinnamon roll train you have to try these and they are incredibly easy! For another fast and cute bake, try these Mini Cinnamon Swirls, using store-bought puff pastry. Or if you want those cozy flavors but with more of a punch, try my Blueberry Chai Muffins!
Equipment
- 10-inch Pie Dish
- Parchment Paper
- Rolling Pin
- Mixing Bowls
- Knives or Food Processor
- Measuring Cups
- Measuring Spoons
- Hand Mixer
Ingredients
- 2 cups flour
- ¾ tsp salt
- ¾ cup unsalted butter cold and cubed
- 4 tbsp cold water
- 2 cans refrigerated unbaked cinnamon rolls (with icing)
- 8 oz cream cheese softened
- ¼ cup powdered sugar
- 1 tsp vanilla extract
- ½ cup sour cream
- ¼ cup brown sugar
- ½ tsp cinnamon
Instructions
- Lightly grease your pie dish and set aside
- Start by making your crust. In a bowl, stir together your flour and salt. Using two butter knives, held against each other with one in each hand to form an “X,” cut your butter into your dough, with the knives pulling away from each other and back in, until you have a sand-like consistency.
- Add in your water (I like to put a few ice cubes in a glass before filling it with cold water to make sure it’s extra cold), cut your water into your dry mixture, and then compress the dough into a ball. See notes below if you have a food processor!
- Place your dough between two large pieces of parchment paper, and roll to ⅛” thickness – making sure your dough is an even thickness throughout.
- Gently peel the parchment back from the top layer, lay it back onto the dough, flip all of it over, and repeat with the bottom (now top) layer of parchment.
- Removing one side of the parchment, carefully lay that side face down into a 9-inch pie dish and remove the top layer of parchment
- Carefully shift the dough to ensure it is laying flat within the pan and along the sides. If you have more than an inch excess, use a butter knife to cut away an extra and save for later.
- Tuck under the remaining excess dough around the edges, to form your crust
- Make a peace sign with your pointer and middle fingers on one hand, place it along the edge of your crust. With the pointer finger of your other hand, pointing toward the center of the peace sign, pull back the dough in the center of your fingers. This will form a crimp. Repeat along the edge of your crust until complete.
- Place your pie dish with the crimped crust in the fridge for 15 minutes
- Preheat your oven to 375F
- For your filling, in a bowl sift your powdered sugar over your cream cheese and beat together. Add in your vanilla extract, sour cream, brown sugar, and cinnamon and beat until smooth
- Remove your cinnamon rolls from their cans and quarter each roll (cutting into four pieces). Remove your pie dish from the fridge and layer the pieces of all of your rolls evenly across the base of your crust
- Pour your cream cheese filling over your cinnamon rolls and spread evenly with a spatula
- Bake at 375F for 10 minutes then, without opening the oven, drop the oven temperature to 325F for 50 minutes. Your pie will be puffed and the filling should appear dry and slightly cracked. There will be a little browning as your cinnamon roll pieces rise in the oven, don’t worry! To check, you can use a digital thermometer inserted into the middle of your pie (pressing into one of the cinnamon roll pieces) and check for an internal temperature of at least 160F, this will ensure the dough has been fully cooked
- Remove from the oven and allow to cool for 10 minutes before liberally drizzling with the icing from the cinnamon roll containers
- Slice and enjoy warm!
- The pie will last in the fridge for two to three days, for optimal freshness. To eat later or the next day, pop a slice into the microwave for 10-15 seconds to soften back up


To be perfectly honest, I didn’t think your cinnamon rolls could get any better. I love the ones I ordered from you at Christmas. But then this cinnamon roll pie, it changed my mind. It was delightful! When you make your book of masterpiece desserts, The cinnamon roll pie definitely needs to be included.
Thank you Joyce! So glad you loved this pie.
Love all things cinnamon and this will be a new favorite.
Yay! Love this Gina!