Simple No-Bake Mint Chocolate Bars with Oreo Crust
If you love a simple, refreshing treat, you have to try these no-bake mint chocolate bars. It’s like a thin mint and a York peppermint patty, but in bar form.
As a recovered mint chocolate hater, I had a slow progression into liking mint chocolate. The first time I realized there was something to it was when a coworker put thin mint cookies in the freezer. Now that was magic.
When done right – like the mint chocolate chip ice cream at Old John’s Diner in the Upper West Side of NYC – mint chocolate has a place with my taste buds, though never ever give me something artificially green.
If you love this recipe, please rate and review it below and tag @accentgolden in your posts on social!
This website uses affiliate links, which may earn commission for purchases made at no additional cost to you.


NO-BAKE MINT CHOCOLATE BARS
I love a no-bake dessert, plus bars are just fun (dessert cut into bars that is). I wanted something that would give Thin Mint vibes, but, to be completely honest, way better and way less expensive.
I respect the hustle, Girl Scouts and Brownies, but that price tag is gonna be a no from me.
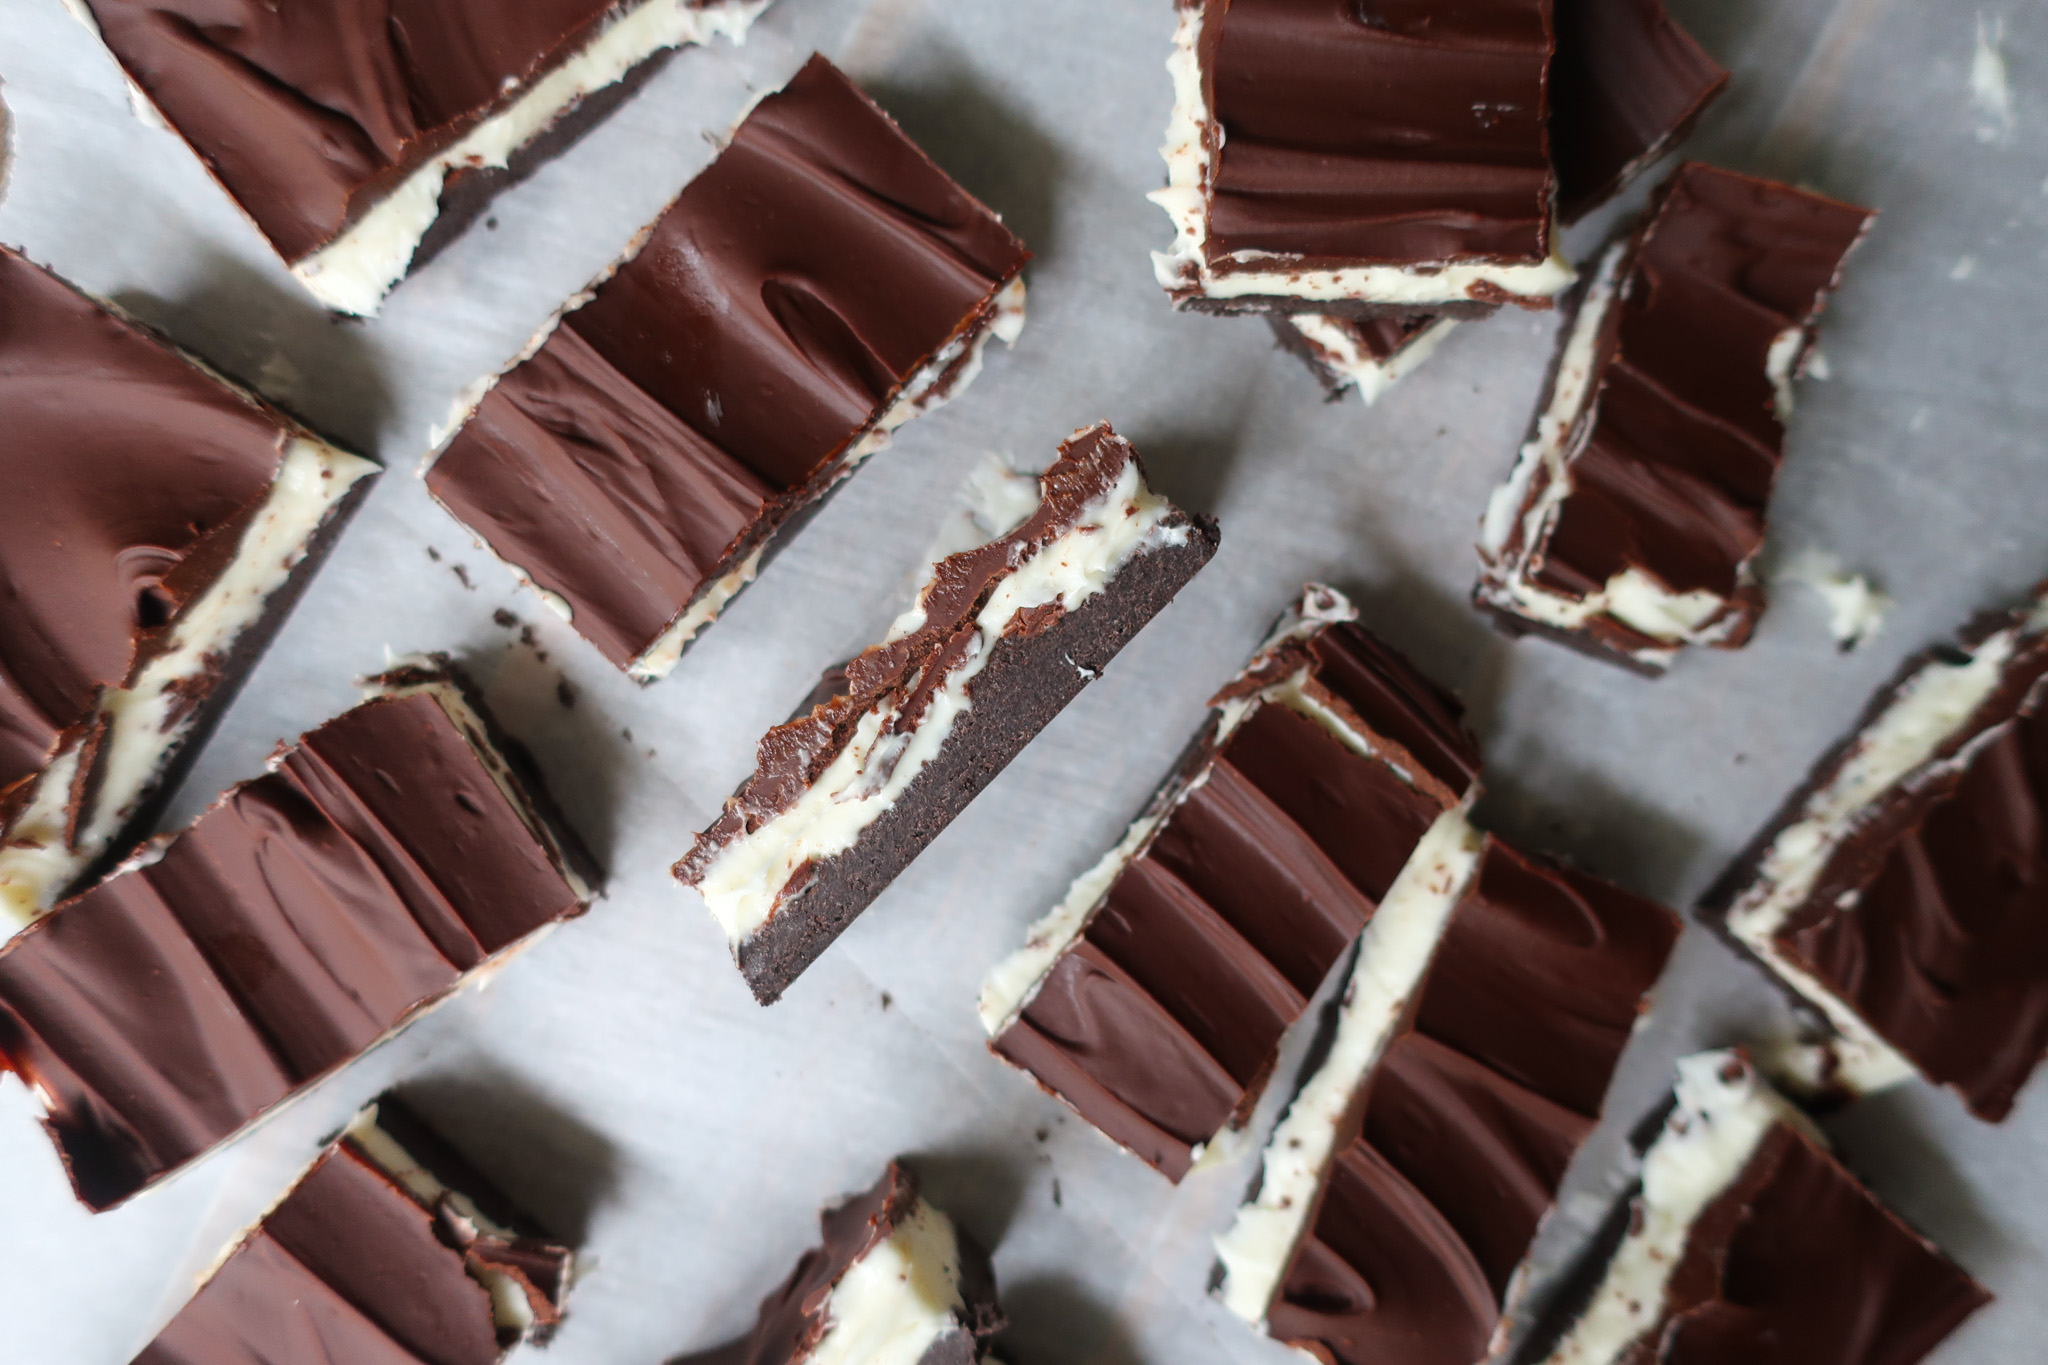
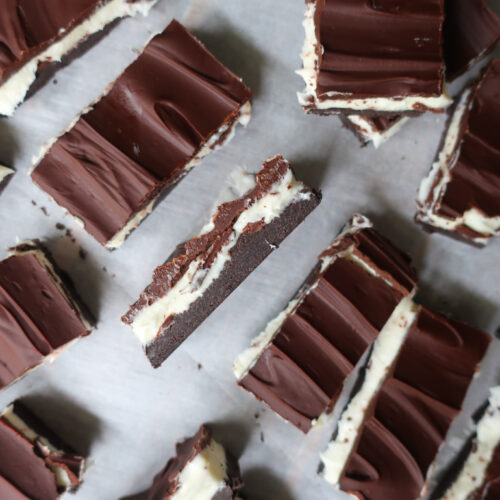
These No-Bake Mint Chocolate Bars have an Oreo cookie base (I know, already yum), a minty cream cheese center, and a semi-sweet chocolate topping. Cut into bars or squares, these are made up of layers of absolute mint chocolate goodness in every bite.
Can I add more peppermint extract? Mix and taste the cream cheese filling as detailed below before adding more peppermint extract. A little goes a long way but if you’d still like more, start with ¼ tsp, mix, and taste.


INGREDIENTS
- Oreos: Make the most delicious base layer for these bars
- Powdered Sugar: Brings a little sweetness to the base and the cream cheese filling
- Unsalted Butter: Used across all three layers to bind, loosen, and add flavor
- Salt: Makes the other flavors pop while offering balance
- Cream Cheese: Gives the perfect tang and creaminess to that minty center layer
- Peppermint Extract: A little goes a long way and smells (+tastes) so good
- Milk: Helps to lightly loosen the middle layer, making sure everything is fully combined
- Semi-Sweet Chocolate Chips: The perfect balance of sweet but rich chocolate flavors for the top layer of these bars
- Heavy Whipped Cream: Helps to thin the chocolate topping while also creating a smoother texture when you bite into the bar
Will an 8”x 8” pan work instead? Yep! Your bars will be a little thicker but will set and taste just the same!
HOW TO MAKE NO-BAKE MINT CHOCOLATE BARS
Grease a baking pan and line one side with parchment paper. I like to tear my parchment a little longer so it leaves a handle on either side of the pan to make lifting the bars out easy.
For your base layer, grab a bowl and stir together your Oreo crumbs and powdered sugar. Pour in your melted butter and mix to combine.
Transfer your Oreo mixture to your lined baking pan and press to form an even layer. Gently press the bottom of a measuring cup to compact the crust inside the base of the pan.
Pop it in the fridge to set while you make your creamy mint layer.
For the mint filling, beat together your softened cream cheese and butter until smooth and creamy in a large bowl. Sift in the powdered sugar, beat, and then add in your peppermint extract and milk, mixing until combined.
Pour your mint filling over your chilled Oreo crust and spread with a spatula into an even layer, then place back into the fridge for at least an hour.
Once your filling has chilled, add your semi-sweet chocolate and butter to a microwave-safe bowl. Melt it in the microwave in 20-30 second intervals, stirring in between until smooth and fully melted.
Add your heavy cream to the melted chocolate mixture and quickly stir together until combined. Pour your melted chocolate over the chilled mint filling, spread it into an even layer, and place the pan back into the fridge for another 2 hours, or until the chocolate topping is firm and set.
Once set, use your parchment paper handles to lift the soon-to-be bars out of the pan and slice with a kitchen knife. At this point, you can cut into squares or bars and enjoy!


3 reasons you’ll love these no-bake mint chocolate bars
TIPS & VARIATIONS
- Be sure to really press your Oreo layer into the base of your pan, so it will hold when you lift the bars out. I use a measuring cup or the bottom of a glass to really press it in
- Your cream cheese layer will be soft, even after its first round in the fridge. When spreading your chocolate layer on top, be careful not to swirl it in
- If you want that minty green look for your bars, you’re welcome to add in a few drops of green food dye to the cream layer
- Your chocolate layer will set however you spread it. Use your spatula to make fun designs in the chocolate before popping into the fridge if desired!
MAKING AHEAD & STORING
These bars will keep in the fridge for up to 4-7 days when placed in an airtight container.
They also freeze incredibly well! You can eat them frozen (though the chocolate layers will be a bit hard to crack through) or place them in the fridge to thaw slightly before eating!
MORE MINT RECIPES
EQUIPMENT YOU’LL NEED
Equipment
- 9×9-inch Baking Pan
- Mixing Bowls
- Spatulas
- Parchment Paper
- Hand Mixer
- Measuring Cups
- Measuring Spoons
Ingredients
- 1 ¾ cups crushed Oreos approx 20 cookies
- ¼ cup powdered sugar
- ½ cup unsalted butter melted
- ¼ tsp salt
- 8 oz cream cheese softened
- 2 tbsp unsalted butter softened
- 1 ½ cups powdered sugar
- 1 ¼ tsp peppermint extract
- 2 tbsp milk
- 1 ½ cups semi-sweet chocolate chips
- 2 tbsp unsalted butter
- ¼ cup heavy whipping cream
Instructions
- Grease and line a 9×9-inch with parchment paper. I like to tear my parchment a little longer so it leaves a handle on either side of the pan to make lifting the bars out easy, once they are ready
- In a bowl, stir together your Oreo crumbs and powdered sugar. Pour in your melted butter and mix to combine. Press into your lined baking pan to form an even layer, then use the bottom of a measuring cup to press further, to tightly compact your crust together.
- Place your crust in the fridge to set while you prepare your mint layer
- For the mint filling, add your softened cream cheese and butter to a large bowl and use a mixer to beat until smooth and creamy. Sift in the powdered sugar, beat, and then add in your peppermint extract and milk, mixing until combined.
- Pour your mint filling over your chilled crust and spread with a spatula into an even layer. Place back in the fridge for at least an hour
- Once your filling has chilled, make your chocolate topping by adding your semi-sweet chocolate and butter to a microwave-safe bowl and melting in the microwave. Heat in 20-30 second intervals, stirring in between until smooth and fully melted. Pour your heavy cream into the melted chocolate mixture and quickly stir together until combined
- Pour your melted chocolate over the chilled mint filling, carefully spreading it into an even layer, and place back into the fridge for another 2 hours, or until the chocolate topping is firm and set
- Once set, use your parchment paper handles to lift the soon-to-be bars out of the pan and slice with a kitchen knife. Cut into bars or squares and enjoy!

Adored these! They were so good! A wonderfully balanced peppermint cream. I have tried many types of chocolate mint deserts and barks and these are an absolute favorite.
So happy to hear that! Glad these are a new favorite for you