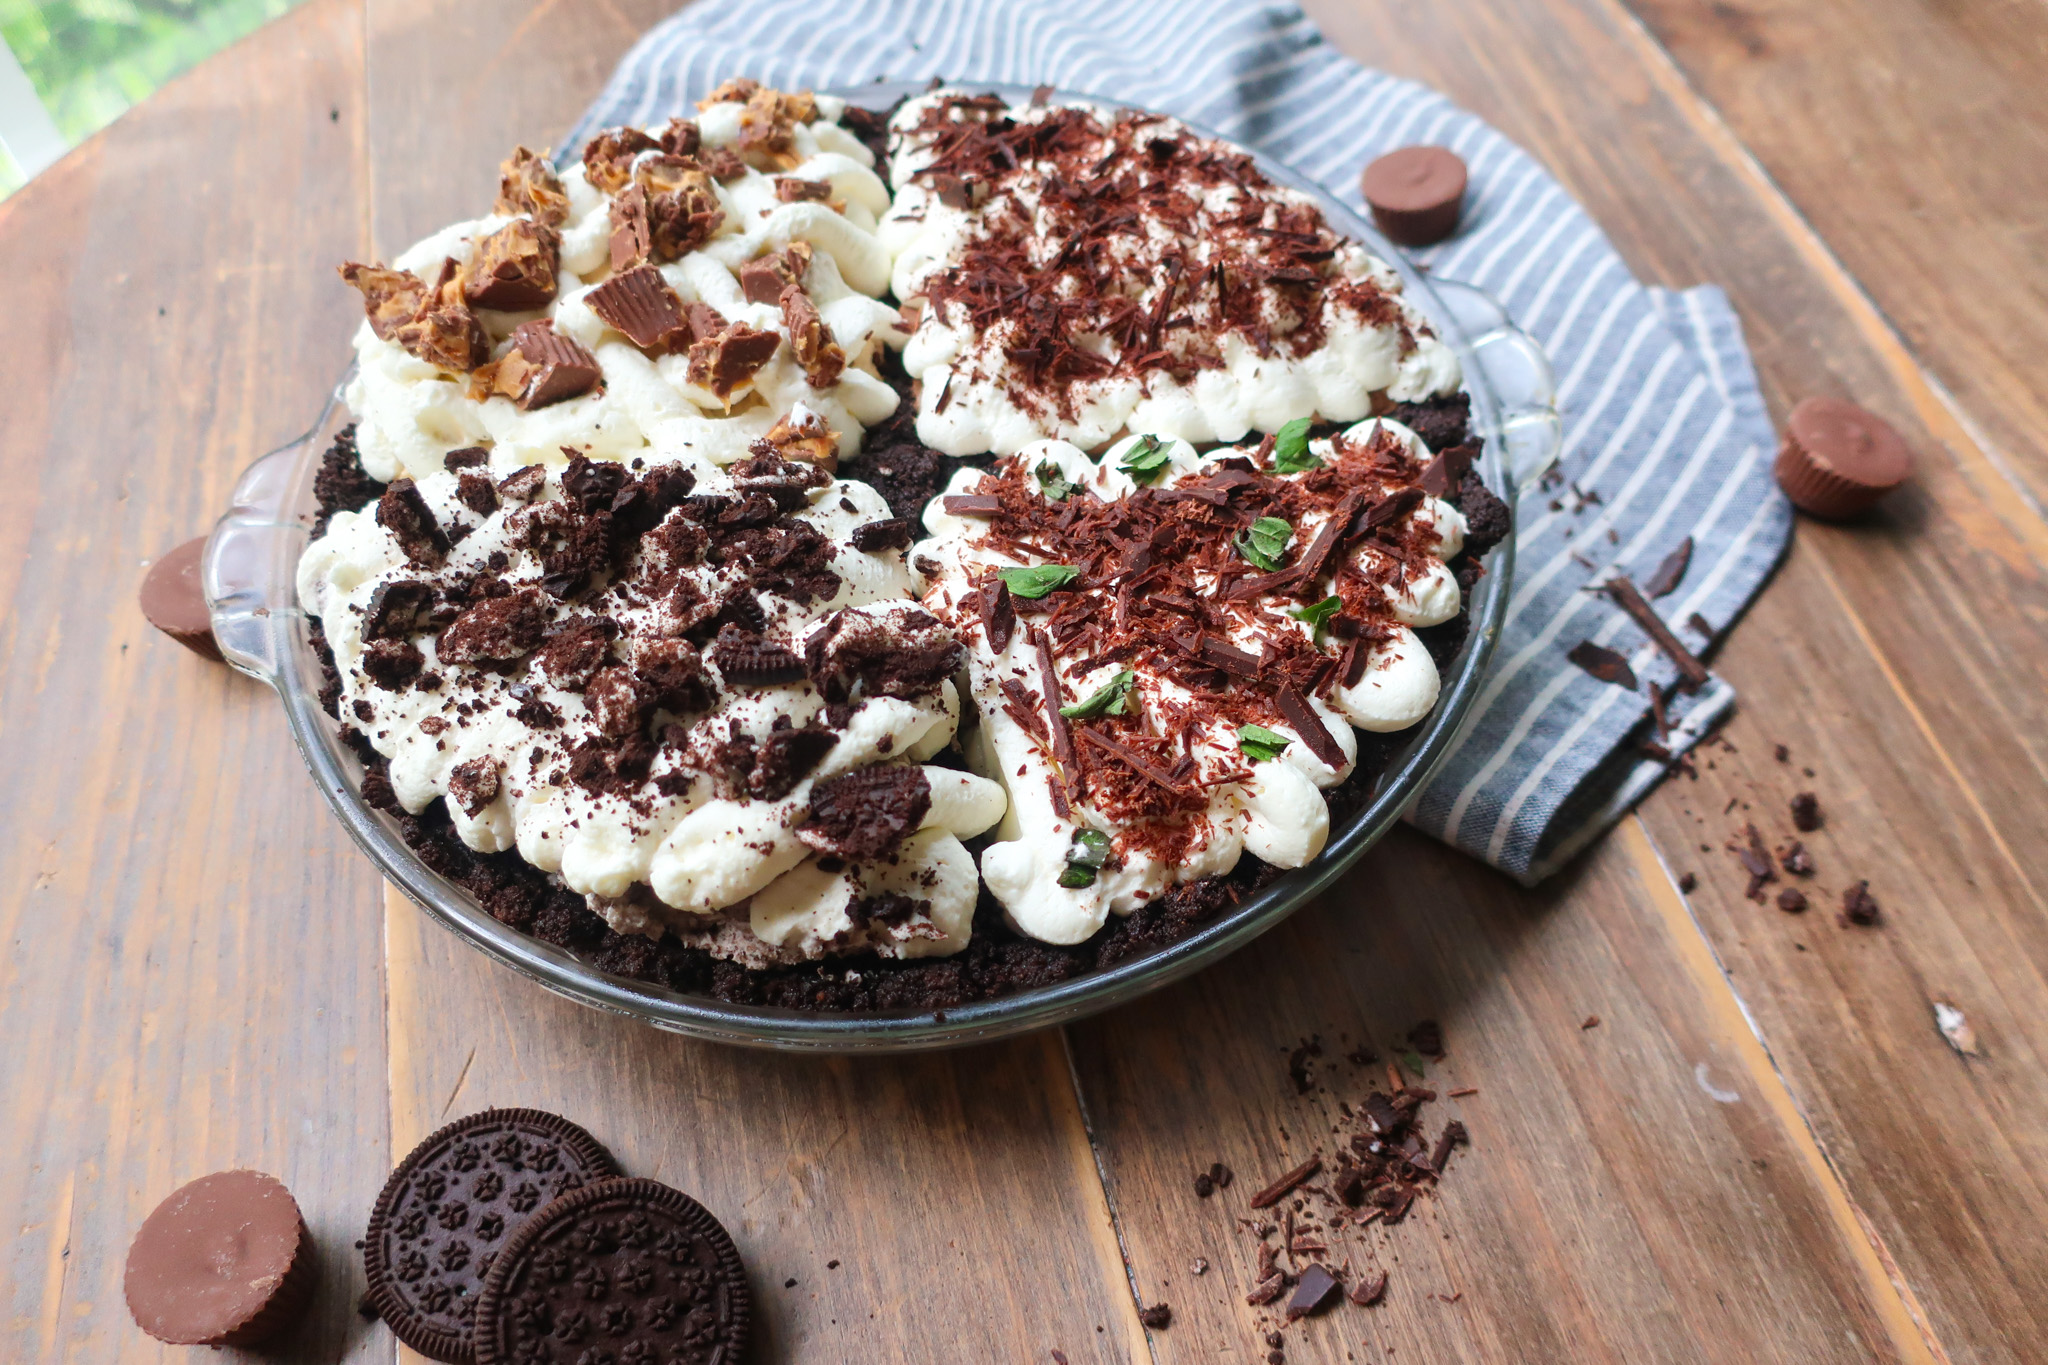
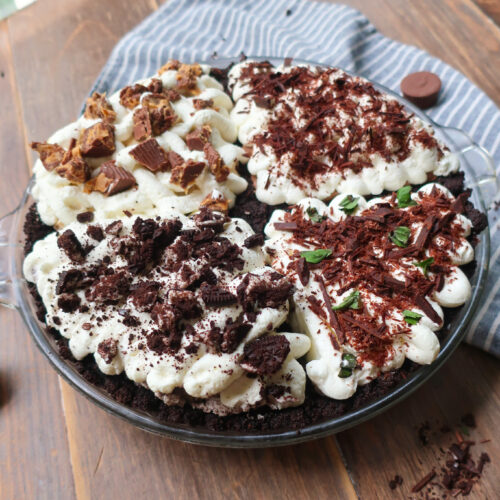
Ultimate No-Bake Oreo Crust Pie with Four Flavors
Why make one flavored pie, when you can make one pie with four flavors? Even better if it’s no-bake! This no-bake oreo crust pie features some of your favorite flavors – peanut butter, Oreo (of course), French silk, and mint chocolate chip. Perfect for hot summer days or really, any time of year. Note, you do have to melt two things: butter and some chocolate, but with how minimal that is I’m still calling this as a no-bake pie.
I shared a more traditional quarter pie, featuring fruit fillings like cherry, strawberry, blueberry, and apple, back in March (Pi Day anyone?). There was so much flavor inspiration in the comments for more quarter pies, especially a no-bake version, that I had to give this one a go. I went chocolate crust first cause, to be honest these are some of my favorite pie flavors, but definitely game for a graham cracker based no-bake version sometime too.
While the more traditionally based fruit-filled quarter pie takes a little more time with assembly, chilling, baking, and cooling, this no-bake pie comes together in no time and is relatively easy to assemble! If you’re a sandcastle master, the delicious construction of your quarters with buttery Oreo crumbs is calling you.
If you love this quarter pie, please rate and review the recipe below and tag @accentgolden in your posts on social!
NO-BAKE OREO CRUST PIE WITH FOUR FLAVORS
You may be wondering, how is this even possible? I thought that too when I got the original inspiration from Terrence. But this no-bake version comes together even more simply, but still oh so cool.
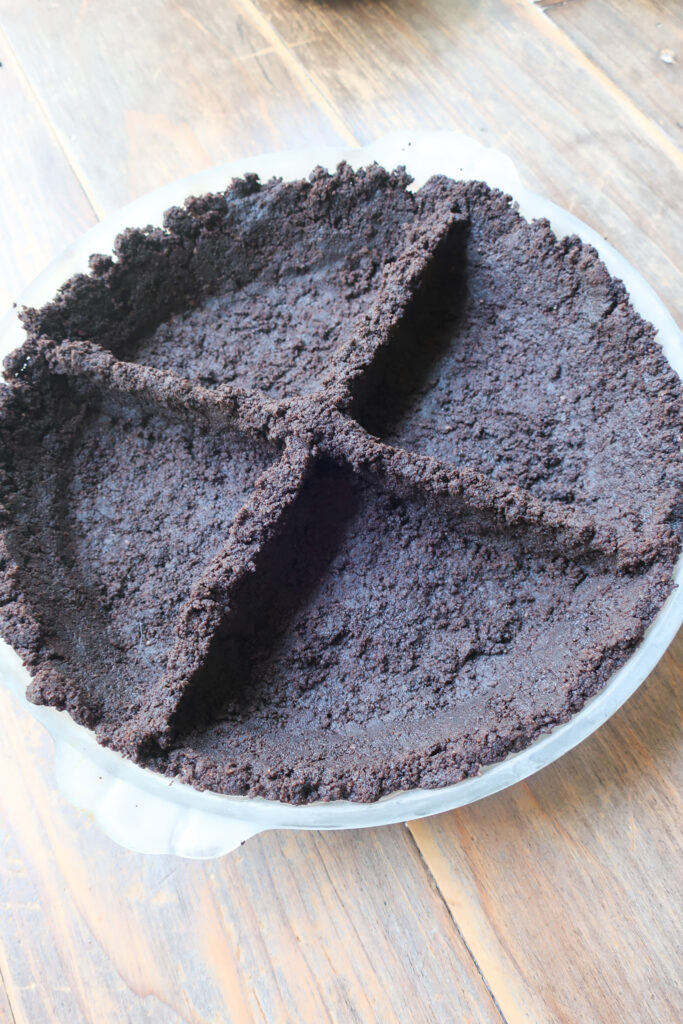
You’ll use a blend of Oreo crumbs and butter to form your sides and bottom crust before freezing. This will ensure that the base of your pie is stable before you build your different barriers. To build those barriers, you’ll add a little more butter to your crumbs, making them extra packable, before forming one long line down the center. Pressing in the top and sides of your line as you stack and build until you’ve cut your pie in half. You’ll repeat this process on either side of that line to form your quarters.
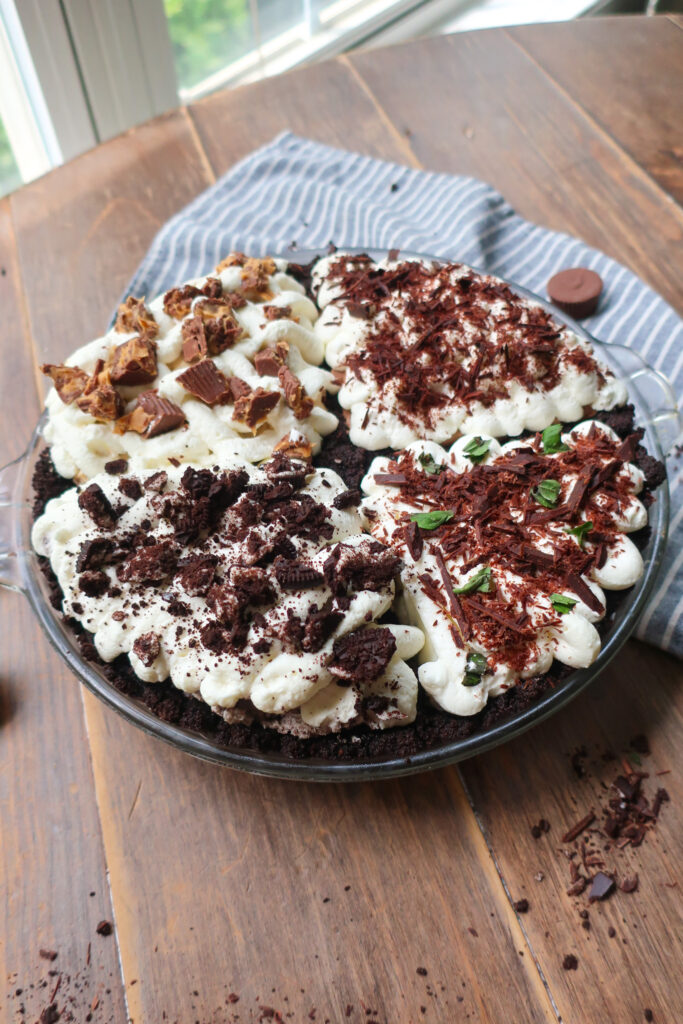
The fillings for this pie are quick and easy, most using similar ingredients. French silk, which is basically a mousse pie, peanut butter, Oreo, and mint chocolate chip. Each pair deliciously with the Oreo base, and after a little time in the fridge, the flavors just pop. Top with a quick two-ingredient whipped cream plus some chopped up chocolate, Oreos, and peanut butter cups, and you have yourself a delicious no-bake quarter pie!
What’s the key to building strong oreo crust barriers? Use a glass to gently press your Oreo crumbs into the sides and base of your crust. Freezing is also key to having that firm foundation to then build your quarter barriers on. When forming your actual barriers, make sure to press the sides and top together as you pack in the crumbs. This will ensure solid boundaries for each pie. Gently press in with a glass again and then pop in the freezer to ensure your crust and its quarters are firmly together before adding your fillings.

INGREDIENTS
- Oreos: The base (and barriers) for your no-bake pie, and essential for your Oreo filling
- Unsalted Butter: To bind your crust together and give it a little flavor. It also helps set your mint filling
- Cream Cheese: Adds stability to your fillings for extra creaminess, as well as the perfect setting texture
- Heavy Cream: Brings the fluff to your flavors as well as the whipped topping
- Powdered Sugar: For a touch of sweetness across the board
- Peanut Butter: Creamy and folded in
- Semi-Sweet Chocolate Chips: Melted for the perfect chocolate mousse
- Vanilla: Rounds out the chocolate flavor in your French silk
- Peppermint Extract: Brings the necessary freshness of course (a little goes a long way!)
- Milk: To loosen your mint chocolate filling a touch
- Mini Chocolate Chips: So you get chocolate and mint in every bite (of that quarter)
- Chocolate + Peanut Butter Candy: Optional, but adds a fun touch on top of the whipped cream and makes it easy to identify each quarter’s flavor
What if I know I will only like three of the flavors? Then double the filling for the flavor you love the most! When you go to form your barriers, make your boundary down the middle and split one side in half, but leave the other side empty. This will give you one full half for your larger filling and two quarters for the other fillings you want to try.
HOW TO MAKE A NO-BAKE OREO CRUST PIE WITH FOUR FLAVORS
Grease a 9 ½” pie pan and set aside.
To make your crust, add your Oreos to a food processor and blitz until fully crushed. This is key for them to stick together. Add your Oreos to a bowl with 8 tablespoons of your melted butter and stir to combine. Use your spatula to chop through the mixture a little as well, to make sure all the butter and Oreos are fully integrated.
Pour two-thirds of your Oreo crumbs into your pie pan. Press the crumbs with your hands up the sides of the dish before patting down the center. Use the bottoms and sides of a small glass to gently press in the bottom and sides before popping your crust in the freezer for 15 minutes to firm up.
Add the remaining butter to the rest of your Oreo crumbs and mix. Pull your chilled crust out of the freezer. Split your remaining Oreo crumbs in half and, similar to building a sandcastle, form a line with your crumbs down the center of your pie, packing in the top and sides as you go (gently!). Once your line is formed, add another layer of crumbs on top, packing as you go, and repeat until the height of your middle barrier reaches the top of your outer crust.
Split your remaining crumbs in half, and repeat these steps on either side of your middle barrier. Be very careful around the middle, connector point, as you form your lines. Press any remaining crumbs along the bottom of your pie and use your glass again to gently press in your crust.
Pop your crust back in the fridge for at least 30 minutes, while you work on your fillings. You can start prepping your fillings in any order you like!
For your peanut butter filling, add your softened cream cheese to a bowl and beat with a mixer to smooth out. Add in your heavy cream and sift over your powdered sugar. Then beat the mixture until fluffy but stiff. Fold in your peanut butter and set aside.
For the Oreo filling, crush half of your Oreos until fine and the other half into chunky crumbles. This will disperse the Oreo flavor better throughout your pie while still giving you chunky bites. In a bowl, beat your softened cream cheese before adding in your heavy cream, sifting over your powdered sugar, and beating until fluffy but stiff. Pour in your Oreos and fold in. Set aside.
For the French silk filling, in a microwave-safe bowl, add your chocolate chips and melt them. In a larger bowl, beat your cream cheese. Then add in your heavy cream, vanilla, and sift in the powdered sugar. Beat until you have fluffy, stiff peaks. Fold in your slightly cooled, melted chocolate until combined. Set aside.
For the mint chocolate chip filling, add your cream cheese and butter to a bowl and beat. Sift in your powdered sugar, mix, then add in your peppermint extract and milk. Beat until smooth before folding in your mini chocolate chips.
To make your whipped cream, add your heavy cream to a bowl before sifting over your powdered sugar. Beat with a mixer until fluffy.
To assemble your no-bake Oreo crust pie, pour each filling into its respective quarter. Spread with a spatula to smooth into the corners as needed. You can place your whipped cream into a piping bag to top your pie, or just dollop and spread it on each section. Chop up any dark chocolate, mint chocolate, Oreo, and/or peanut butter cup candy and sprinkle over each section of your pie.
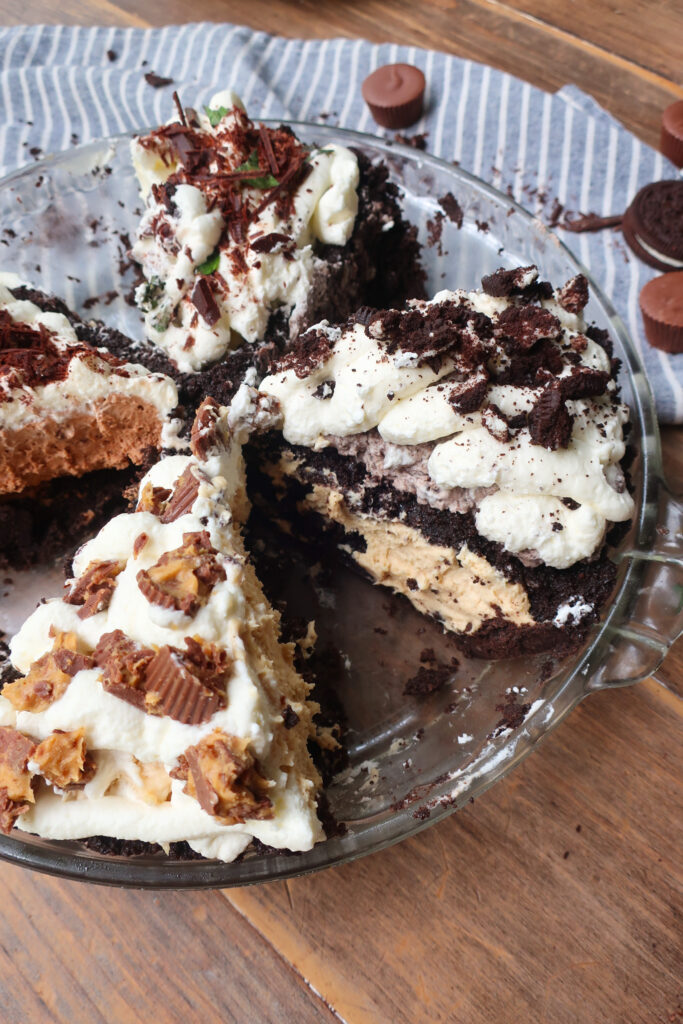
Place your pie in the fridge uncovered for at least 6 hours or overnight. Slice and enjoy!


3 reasons you’ll love this pie
TIPS & VARIATIONS
- For your crust, you want your Oreo crumbs fine. I highly recommend using a food processor but if you don’t have one, really crushhhh those Oreo crumbs inside a zip-top back with a rolling pin.
- As you form your quarter barriers, make sure you pack in the bottom and sides of each line as you build it. This will make the boundaries solid (something we aim for in pie and life) before freezing and filling.
- When building your barriers, make sure you make the lines for each quarter reach the top rim of your pie. This will ensure that the fillings don’t overlap as you spoon them in and have clear boundaries between them.
- Don’t skimp on the freezing times required to form your quarter pie. You want to make sure the base of your crust is firm before forming your barriers. Additionally, before filling your pie you want to give those barriers time to solidify before adding in each flavor.
- While you may want to eat your pie right after filling and topping, don’t! Give the flavors time to become besties in the fridge, the filling time to set, and the cookies in and on top of your Oreo quarter, to soften.
- If you don’t want to buy semi sweet chocolate in chips and mini chips, for the mint chocolate filling just measure regular chips and chop them up into smaller bites. Or, for the French Silk, measure out your mini chocolate chips and melt those as directed.
- Be careful not to over whip your fillings or whipped cream. For most of the fillings, it’s important that you whip them until they are on the stiffer side, since you’ll knock air out of the filling once you fold in things like peanut butter or melted chocolate. Be cautious that if you whip it too far, the whipping cream could start to separate and become a little greasy.
- Make sure you let your pie chill for at least 6 hours! The flavors are even better after sitting overnight but you really want to give it those first few hours to do what it needs to do in the fridge
- The same techniques can be applied if you want to try this with a graham cracker crumb base instead of an Oreo. Feel free to use this recipe as a template for forming all of your favorite pie flavors into one!
MAKING AHEAD & STORING
Once formed, your Oreo crust can be wrapped tightly and stored in the freezer for up to 3 months. If using from frozen, simply fill with your fillings and store in the fridge to set for a few hours. This will leave enough time for your crust to thaw and your flavors to marry.
After you’ve built and filled your no-bake Oreo crust pie, you can store it in the fridge lightly covered for up to 3-5 days. Additionally, you can slice and wrap pieces of your pie and store in the freezer for up to two months. Note that due to the high dairy content, this will likely affect the creamy texture of your pie.
MORE NO-BAKE RECIPES
One of my favorite no-bake treats is this Easy Key Lime Coconut Icebox Cake. It’s made with layers of coconut whipped cream, key lime cookies, lime curd, and coconut flakes. For a small chocolatey bite, try these Fudgy No Bakes – only six ingredients that will satisfy any chocolate craving. A family favorite, this Pistachio Dessert will please a crowd and have them asking for more.
Equipment
- 9 ½” pie dish
- Food processor or zip-seal bags
- Mixing Bowls
- Fine Mesh Sieve
- Parchment Paper
- Measuring Cups
- Measuring Spoons
- Mixer
- Spatula
- Piping Bags, optional
Ingredients
- 36 Oreos
- 9 tbsp unsalted butter melted
- 1 oz cream cheese room temperature
- ⅔ cup heavy cream
- 4 tsp powdered sugar sifted
- 3 ½ tbsp creamy peanut butter
- 1 oz cream cheese softened
- ½ cup heavy cream
- ½ tbsp powdered sugar
- 4 Oreos divided
- 3 ½ tbsp semi-sweet chocolate chips melted and cooled
- 2 oz cream cheese softened
- 2 tbsp powdered sugar
- ¼ tsp vanilla extract
- ¾ cup heavy whipping cream
- 4 oz cream cheese softened
- 1 tbsp unsalted butter softened
- ¾ cup powdered sugar
- ½ tsp peppermint extract
- 1 tbsp milk
- 1 ½ tbsp mini chocolate chips
- 1 cup heavy cream
- 2 tbsp powdered sugar sifted
- Oreos, peanut butter cups, mint candy, chocolate pieces optional for topping quarters
Instructions
- Lightly grease a 9 ½” pie pan and set aside
- For the crust, use a food processor or zip-seal bag to crush your Oreos until fine. You want them pulverized here so they stick together later
- Add your finely crushed Oreos to a bowl with 8 tablespoons of melted butter and stir to combine. Pour 2/3 of this mixture into your pie pan and press up the sides and along the bottom to form your crust. Use a glass or the flat bottom of a measuring cup and gently press to pack it in
- Place your crust in the freezer for 15 minutes. You want it to be firm before creating your barriers
- After 15 minutes, form your crust into a quarter pie crust. Remove your pie crust from the freezer. Melt your remaining tablespoon of butter and mix it into the bowl with your leftover Oreo crumbles. Now split those crumbles in half and, like when you build things in sand, start to form a low “wall” going down the center of your crust. Make sure you gently press in the sides and down on the top to pack it in. You’ll have a short wall at first, then go back and add more crumbles on top, packing and building your wall until it’s level with the top of the outer crust.
- To turn two sections into four, split your remaining Oreo crumbs and repeat the above step on either side of the long wall. Be very careful as you connect your walls in the middle, since your crumbs will be fragile. Press any remaining crumbs along the bottom, center, and edges of each barrier. Use a thin cup or just a spatula to gently press together your barriers one last time
- Place your crust in the freezer for at least 30 minutes, while we make the fillings
- For the peanut butter filling, beat your softened cream cheese in a bowl to smooth out before adding in your heavy cream and sifting over your powdered sugar. Beat until fluffy but on the stiffer side, before folding in your peanut butter. Set aside
- For the Oreo filling, add half of your Oreos to a food processor or zip-seal bag and crush until fine. In a bowl, add your softened cream cheese and beat to smooth. Then add in your heavy cream and sift over your powdered sugar. Beat until fluffy, again on the stiffer side. Crush your remaining Oreos until crumbly and fold them into your whipped cream mixture. Set aside
- For the French silk filling, beat your cream cheese in a bowl before adding in your heavy cream, vanilla, and sifting in your powdered sugar. Beat until fluffy but on the stiff peaks side. Fold in your melted and cooled chocolate until combined
- For the mint chocolate filling, beat together your cream cheese and butter until combined. Sift in your powdered sugar and mix. Add in your peppermint extract and milk, mixing until smooth. Fold in your mini chocolate chips. Set aside
- To make your whipped cream topping, add your heavy cream to a bowl and sift over your powdered sugar. Beat with a mixer until fluffy
- To assemble, pour one filling it each section of the quarter pie and top with your whipped cream. For the whipped cream, you can spread it over top or place it into a piping bag, cut off the tip, and dot it over each section. If desired, top each section with crumbles of Oreo, peanut butter cups, mint chocolate, and chocolate shavings.
- Place your pie into the fridge uncovered to chill and set for at least 6 hours or overnight
- Slice and enjoy!


This pie is incredible! Hard to pick a favorite but you don’t have to with 4 fabulous choices😋
Exactly! So glad you loved it