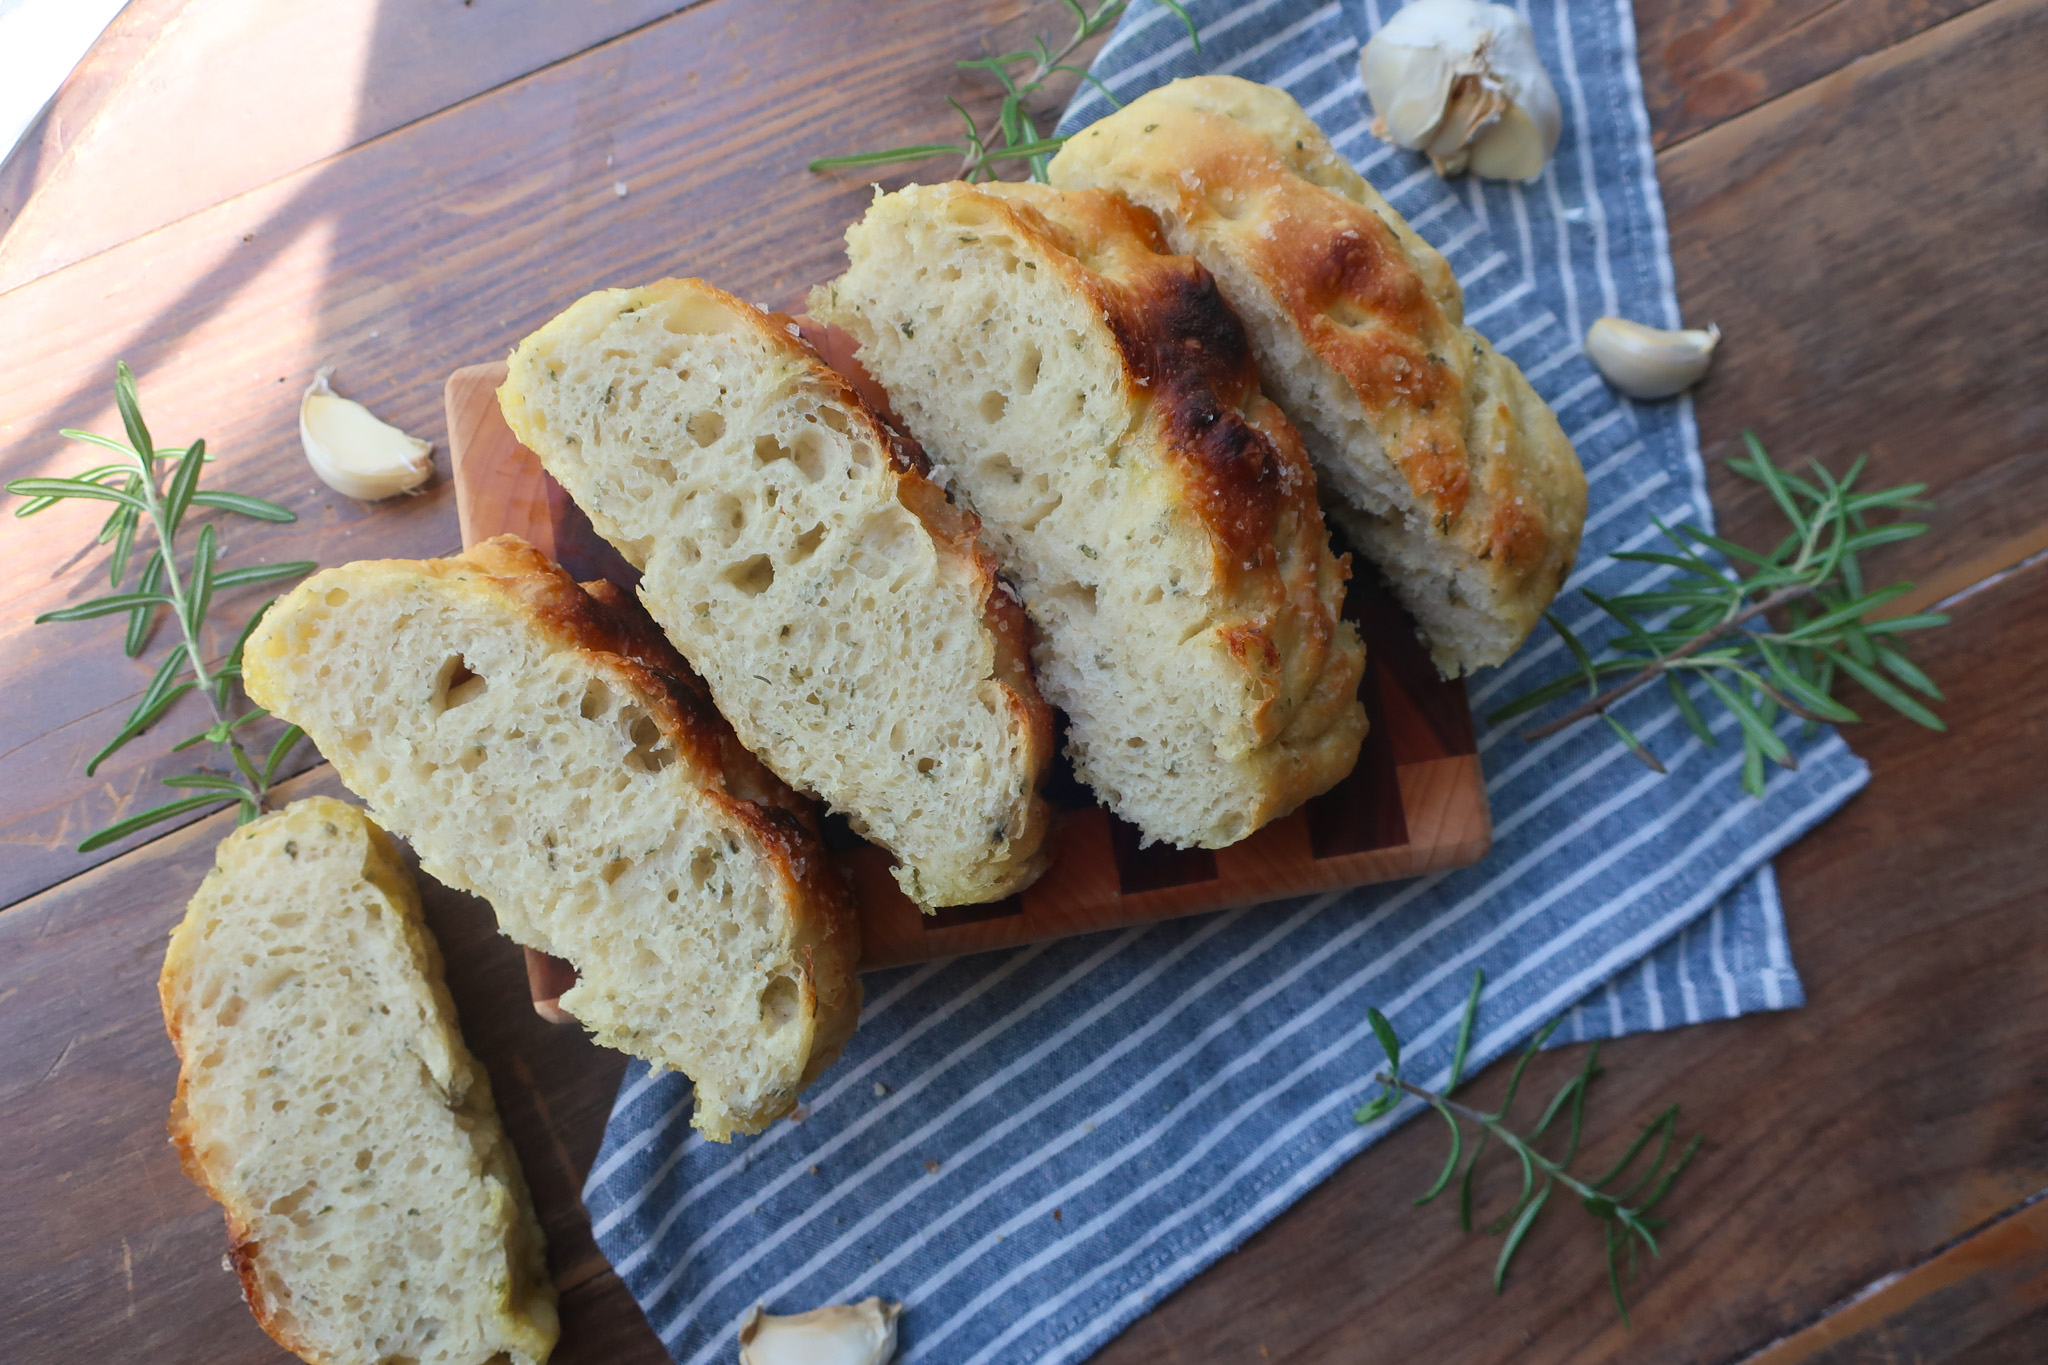
Mini Toaster Oven Roasted Garlic Rosemary Focaccia
This is a powerhouse of flavor in one mini toaster oven focaccia recipe. Unless we’re feeding a large family or group of friends, we don’t always need a giant pan of focaccia (need… want is completely different). This recipe comes together easily for those in small spaces, with little to no kitchen, who want to make homemade bread with minimal fuss.
While there are two styles of focaccia bread, I personally love the extra fluffy one. Now, since it’s being baked in a toaster oven (see instructions below if you’re baking in a regular oven), you aren’t going to get that even golden color across the top and sides. The heat source and distribution are a little more direct, with less flow. It’ll still be perfectly delicious and make for a yummy side with soup or into a bombbb sandwich.
If you love this recipe, please rate and review it below and tag @accentgolden in your posts on social!
This website uses affiliate links, which may earn commission for purchases made at no additional cost to you.


MINI TOASTER OVEN FOCACCIA
For our small-batch focaccia, we’re going to start by roasting our garlic. Since we’re only using a few cloves and not the whole head, just place a few in a pool of olive oil on a sheet of foil. Then fold into a little packet, and pop it in your toaster oven to roast while you prep your dough.
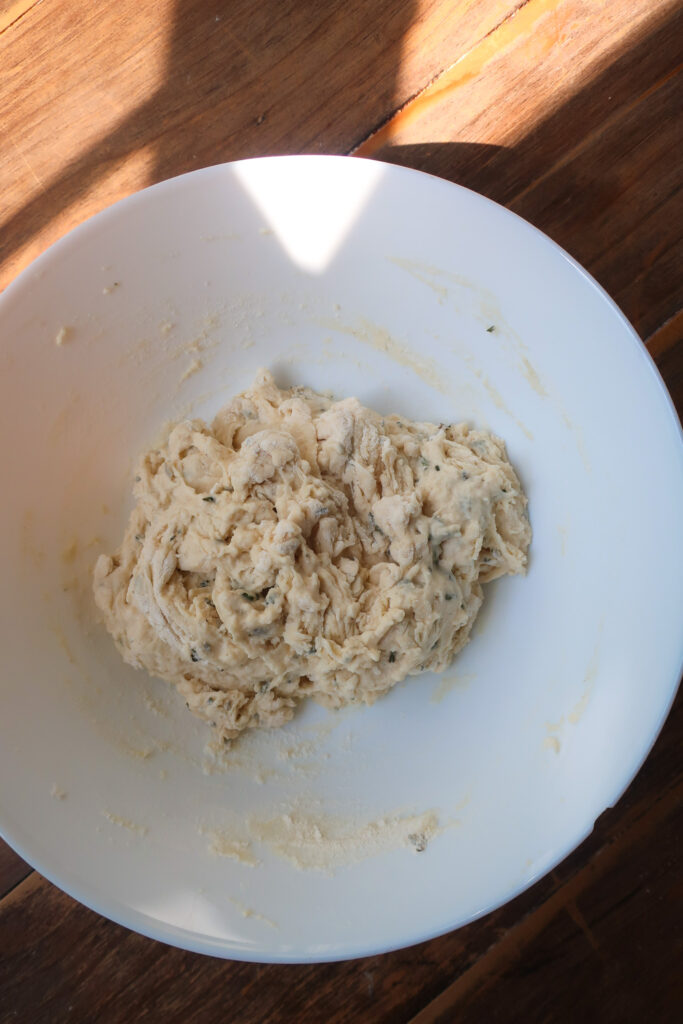
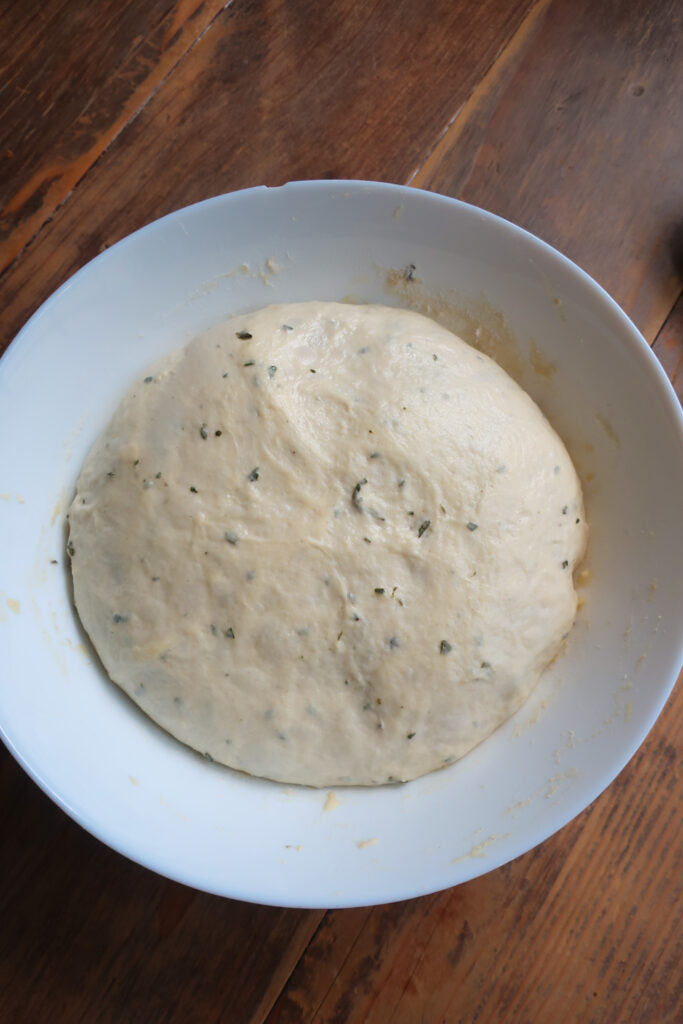
One of my favorite parts of this recipe is that it all comes together in one bowl. Mix, stretch, and rise without having to transfer! While this is a no-knead focaccia recipe, you do have to do some stretch and folds, and one coil fold. This will help to stretch and strengthen your gluten for a nice puffy bread!
Do I need a specific pan to bake this focaccia in my toaster oven? Yes, you will need a small, rectangular pan. I used an 8” x 5 ½” foil pan.
INGREDIENTS
- Garlic: Roasted to add rich, sweet, mellow flavor to the focaccia.
- Olive oil: Used for roasting garlic, enriching the dough, and creating a golden, crisp crust.
- Warm water: Activates the yeast and hydrates the dough for proper gluten development.
- Sugar or honey: Feeds the yeast to help the dough rise and adds subtle flavor.
- Active dry yeast: Leavens the dough, creating a light and airy texture.
- Bread flour: Provides structure and chewiness thanks to its higher protein content.
- Rosemary: Adds aromatic, earthy flavor that pairs well with garlic.
- Salt: Enhances flavor and strengthens the dough’s gluten structure.
- Flaky sea salt: Optional finishing touch that adds texture and bursts of saltiness.
Can I bake this focaccia in a regular oven? You can absolutely bake this in a regular oven. Because the heat distribution will be more even, the focaccia should be done a little faster, so check around the 18-minute mark.
HOW TO MAKE MINI TOASTER OVEN FOCACCIA
Preheat your toaster oven to 350°F for at least 5 minutes. Place the unpeeled garlic on a small square of foil. Drizzle with olive oil to coat, then wrap tightly into a sealed foil pouch. Roast in the toaster oven for 15 minutes, remove, let cool, mash with a fork, and set aside.
To make the focaccia dough, combine warm water and honey in a large bowl, then sprinkle the yeast over the top and let it sit for 5 minutes. Add the flour, chopped rosemary, and salt, stirring until a sticky dough forms. Cover the bowl with a towel and let it rest in a warm place for 10 minutes (a microwave or slightly warmed kitchen spot works well).
After resting, perform one set of stretch and folds by imagining the dough as a square: gently lift and stretch the top side over the bottom, then rotate the bowl 90 degrees and repeat for all four sides. Cover and let rest for another 10 minutes. Dot the roasted garlic over the dough, then repeat the stretch and fold process once more, cover, and rest for 10 minutes.
Next, perform one set of coil folds by gently scooping under the middle of the dough with your fingers and tucking the top and bottom sides underneath, rotating the bowl 90 degrees, and repeating. Lightly drizzle olive oil over the dough, cover, and let rise at room temperature for about 1 hour or until doubled in size.
Meanwhile, pour olive oil into an 8″ x 5½” pan and coat the bottom and sides. Using oiled fingers, transfer the dough to the pan, gently fold it like an envelope (top down a third, bottom up over the top), then flip it seam-side down into the pan. Let it rest for 20-30 minutes until it mostly fills the pan.
Preheat your toaster oven to 425°F. Drizzle olive oil over the dough and dimple deeply with your fingertips, then sprinkle with flaky sea salt. Bake on the lowest rack for 23-26 minutes, rotating the pan 90 degrees every 4 minutes after the first 12 minutes to ensure even browning.
Cool your mini toaster oven focaccia in the pan for 10 minutes before transferring to a rack to cool for another 15-20 minutes. Enjoy it as is or use it for a delicious sandwich!


3 reasons you’ll love this mini focaccia
TIPS & VARIATIONS
- If you don’t like garlic (*GASP*), you can omit the roasted garlic from the recipe and still have a delicious rosemary focaccia. If you prefer a completely plain focaccia, just remove the rosemary and garlic entirely.
- This focaccia can be baked in a regular oven as well. It will develop a more traditional golden color over the top because of the more fluid flow of heat in a larger oven. This also means it will bake faster. It should be done at the 18-minute mark.
- While this mini toaster oven focaccia comes together in just a few hours, you can also prep your dough the day before and let it do a cold proof in the fridge. See the instructions in the “Making Ahead and Storing” section
- Focaccia is a fluffy dough, so don’t be alarmed as it rises in the toaster oven while it bakes. I use this Black & Decker toaster oven, which seems to be a pretty standard size, and it works perfectly. Just make sure you’re rotating your pan as it bakes, for a more even color.
MAKING AHEAD & STORING
You can make this focaccia dough the day before if desired. After you perform the coil fold, let your dough rest for 10 minutes, then cover your bowl with plastic wrap and place it in the fridge for 15 hours. Pour 1 tbsp of olive oil in your baking pan, remove the dough from the fridge, and transfer it gently to your pan. Folding the dough like an envelope and flipping the seam side down. Cover and let rest for 1 hour before gently stretching the dough to fit the pan. Leave uncovered for 15-30 minutes, until puffed and jiggly, then follow instructions below for dimpling and baking.
Once baked, store your mini toaster oven focaccia in an airtight container. It will keep at room temperature for 3 days or 6 days in the fridge. You can also freeze it for up to 3 months.
MORE ROSEMARY RECIPES
If you love rosemary in bakes, you’ll love this simple Mushroom & Rosemary Galette. Few ingredients and packed with flavor. For a classic but sweet combo, try these Rosemary & White Chocolate Scones. If you love rosemary and white chocolate, you also have to give these Rosemary & White Chocolate Madeleines a try! As pretty as they are tasty. For something easy and savory, these Rosemary Cannelini Beans are a must.
EQUIPMENT YOU’LL NEED

Equipment
- 8”x5 ½” pan
- Foil
- Fork
- Measuring Spoons
- Digital Scale
- Spatula
Ingredients
- 3-5 cloves garlic unpeeled
- 1 tsp olive oil
- 180 g warm water around 110°F
- 1 tsp sugar or honey
- 3 g ¾ tsp active dry yeast
- 200 g bread flour
- 2 tsp chopped fresh rosemary 1 tsp dried
- ¾ tsp salt
- 2 tbsp olive oil
- Flaky sea salt optional but recommend
Instructions
- Preheat your toaster oven to 350°F for at least 5 minutes
- Place the unpeeled garlic on a small square of foil. Drizzle with olive oil to coat. Wrap tightly into a sealed foil pouch. Roast for 15 minutes in your toaster oven. Remove the packet from the oven, let cool, peel off the skins, then mash with a fork and set aside
- For your focaccia: Combine the warm water and honey in a large bowl, then sprinkle the yeast over top. Let it sit for 5 minutes
- Add the flour, chopped rosemary, and salt to the bowl with the yeast. Stir until a sticky dough forms
- Cover the bowl with a towel and let it rest in a warm place for 10 minutes. I usually place mine in the microwave or in a slightly warmed spot in my kitchen
- After 10 minutes, perform one set of stretch and folds: looking down at your dough in the bowl, imagine it has four sides (like a square versus a circle). Take the top side, gently lift it up, and pull it over the dough down to the bottom side. Rotate your bowl 90 degrees. Now you have a new top side; lift that up, stretch it up and over down to the new bottom side. Repeat until you’ve done this four times (for all four “sides”). When stretching, lift your dough closer towards the bottom to avoid tearing. Cover and let the dough rest for 10 minutes
- Dot your roasted garlic over the top of your dough. Then repeat the stretch and fold one more time, so you’ll have done two sets of stretch and folds. Cover and rest for another 10 minutes
- Lastly, perform one set of coil folds. Again, looking at your dough and imagining four sides, use your pointer and middle fingers of each hand and scoop under the middle of the dough, lifting it gently, and tuck the top side under, towards the middle. Then tuck the bottom side under, towards the middle. Rotate your bowl 90 degrees, and do another coil fold on each top and bottom.
- Lightly drizzle the top with olive oil, cover, and let rise at room temperature for 1 hour or until the dough doubles in size
- Pour 1 tbsp olive oil into your 8″ x 5½” pan and coat the bottom and sides.
- With oiled fingers, transfer your dough to your pan, then gently fold the dough like an envelope (top down a third of the way, bottom up and covering the top) and flip it seam-side down into the pan. Let rest for 20-30 minutes, until it mostly fills the pan
- Preheat your toaster oven to 425°F
- Drizzle 2 tsp olive oil over the dough and dimple the dough, pressing your fingertips in deeply. Then sprinkle with flaky sea salt
- Bake on the lowest rack of your toaster oven for 23-26 minutes. After 12 minutes, rotate your pan 90 degrees, then repeat every 4 minutes. Don’t worry, your dough will rise as it bakes, just keep rotating it to help the color develop more evenly
- Cool in the pan for 10 minutes, then transfer to a rack and cool another 15–20 minutes before slicing
- Enjoy as is or make into a delicious sandwich!