How to Make French Baguettes at Home
Bread in general is great, but French baguettes? Oui OUI!
This recipe gives you the perfect baguettes right at home, that will have you pretending you’re walking out of a boulangerie in Paris. WAKEY WAKEY, you’re in your own home, silly.
If you love this recipe, please rate and review it below and tag @accentgolden in your posts on social!
This website uses affiliate links, which may earn commission for purchases made at no additional cost to you.

WHAT MAKES A BAGUETTE, A BAGUETTE?
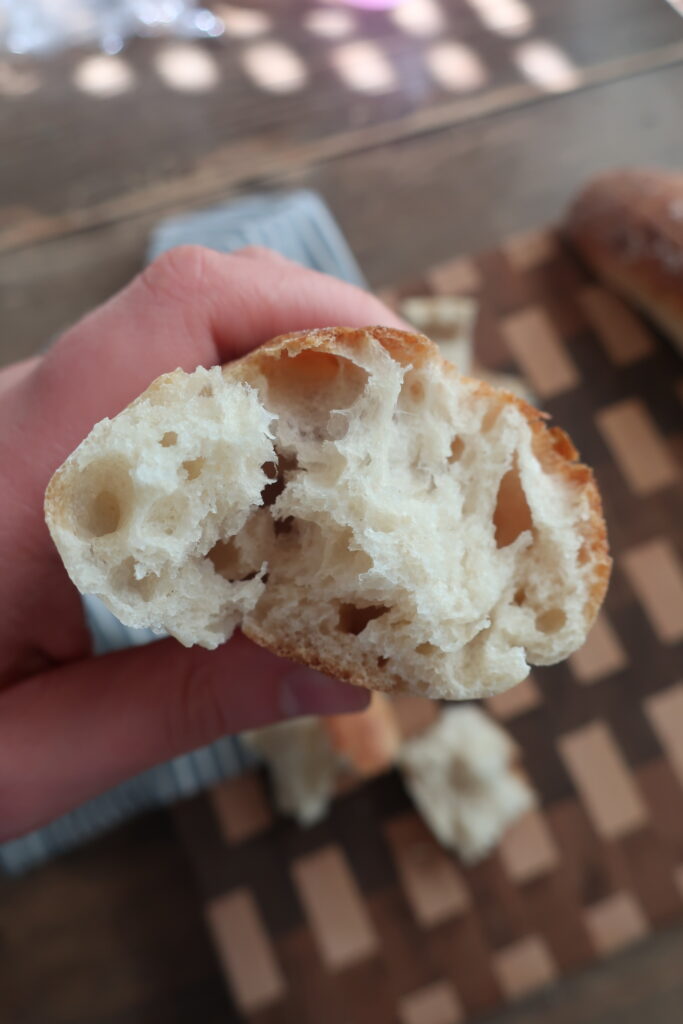
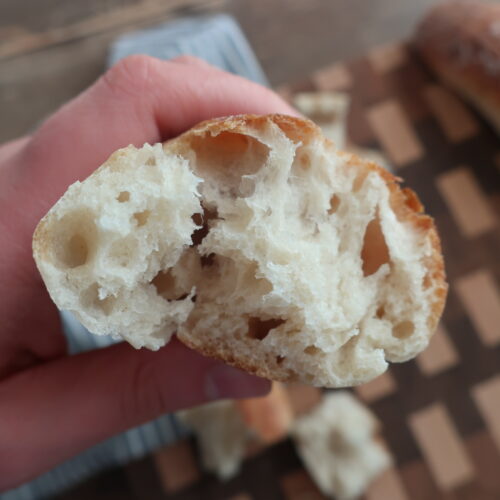
A baguette is defined by its crispy golden crust and airy interior with irregular holes. Alongside traditional shaping and baking techniques that give it its signature texture and flavor.
It’s a long, thin French bread made from just flour, water, yeast, and salt, with no fats or sugar.
With this recipe, I want you to remember: delicious dough takes time. You will need to prep your starter – poolish – for this the night before. Plus, know that these delicious bread wonders will take you most of the day, between mixing, shaping, and rising times, before you’re ready to bake.
Lastly, a digital scale is required for this – precision is key, my friends.
OK, now that you’re prepared… allons-y!
What is poolish? Poolish is a type of bread starter, made from flour, water, and yeast, and left to ferment overnight. It enhances the baguettes’ flavor and texture, while creating that crisp, golden crust.
INGREDIENTS
- Bread flour: provides structure and gluten for the dough.
- Water: hydrates the flour and helps activate the yeast.
- Active dry yeast: leavens the dough, making it rise.
- Salt: enhances flavor and strengthens gluten.
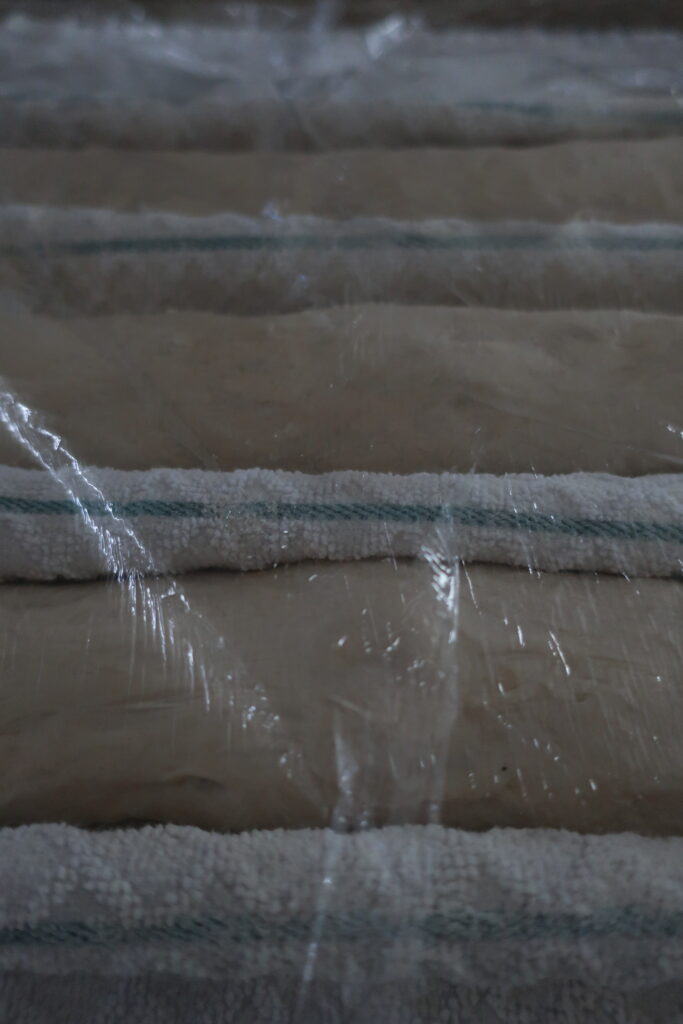
What is a couche? A couche is a heavy, durable linen used in French baking to support baguettes during proofing. Folding the cloth creates dividers that help the dough rise upward evenly without spreading out.
HOW TO MAKE FRENCH BAGUETTES
Start by making your poolish. Mix all poolish ingredients together — it’s okay if lumpy — and cover with a damp cloth. Let it sit at room temperature for 12–16 hours.
For your baguettes, combine water and flour until a dough ball forms, either by hand or with a mixer. Then cover and rest for 30 minutes. Add the poolish and mix until smooth and no longer sticking to the bowl.
Activate the yeast by mixing it with a small amount of water and let sit for five minutes. Then incorporate into the dough. Turn the dough onto a counter and perform stretch-and-fold motions until it becomes elastic, using a scraper as needed.
Flip the dough so the sticky side faces up, add salt, and knead until smooth. Transfer to a clean bowl, cover, and rest for 40 minutes.
Perform coil folds by lifting, stretching, and tucking the dough, rotating the bowl after each fold. Repeat two more rounds with resting periods in between until the dough doubles in size.
Divide the dough into three portions, gently roll into balls, and let rest uncovered for 15 minutes. Prepare your floured couche or kitchen towel, creating back “gates” to support the dough during shaping.
Shape each ball into a rectangle, fold, and roll gently into a cylinder the length of your tray. Place each baguette seam-side down on the couche with a crimp on each side, pressing out air bubbles, then cover and rest for about an hour.
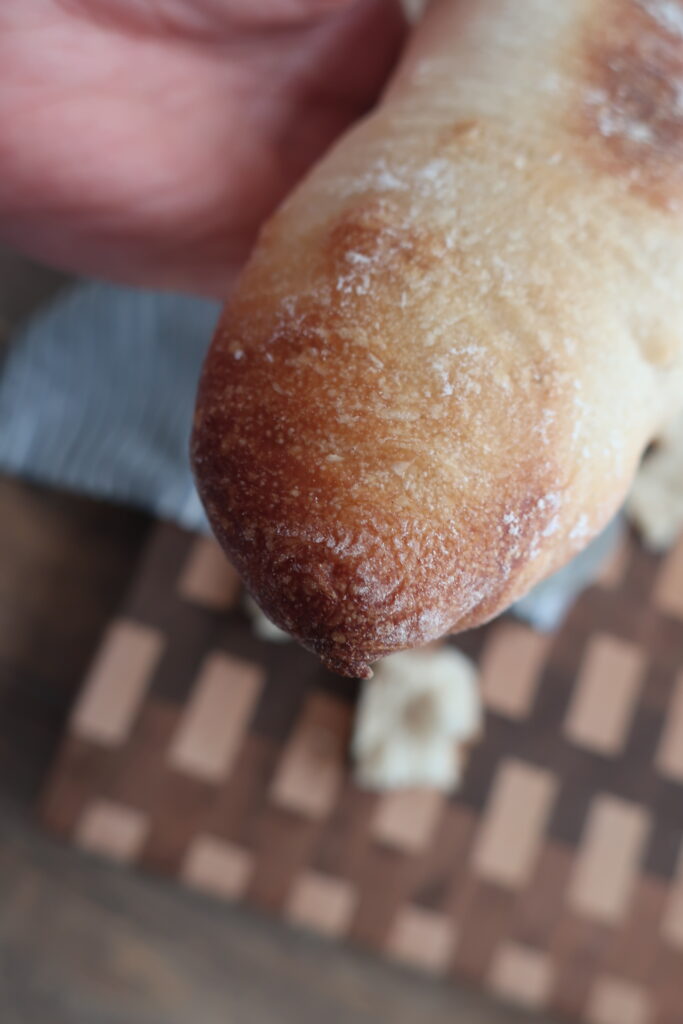
Preheat the oven to the highest convection setting with a heat-safe pot at the bottom, and boil 2–3 cups of water. Transfer baguettes to a baking tray, score them with 2-inch diagonal cuts, pour the boiling water into the pot, and bake for 10 minutes.
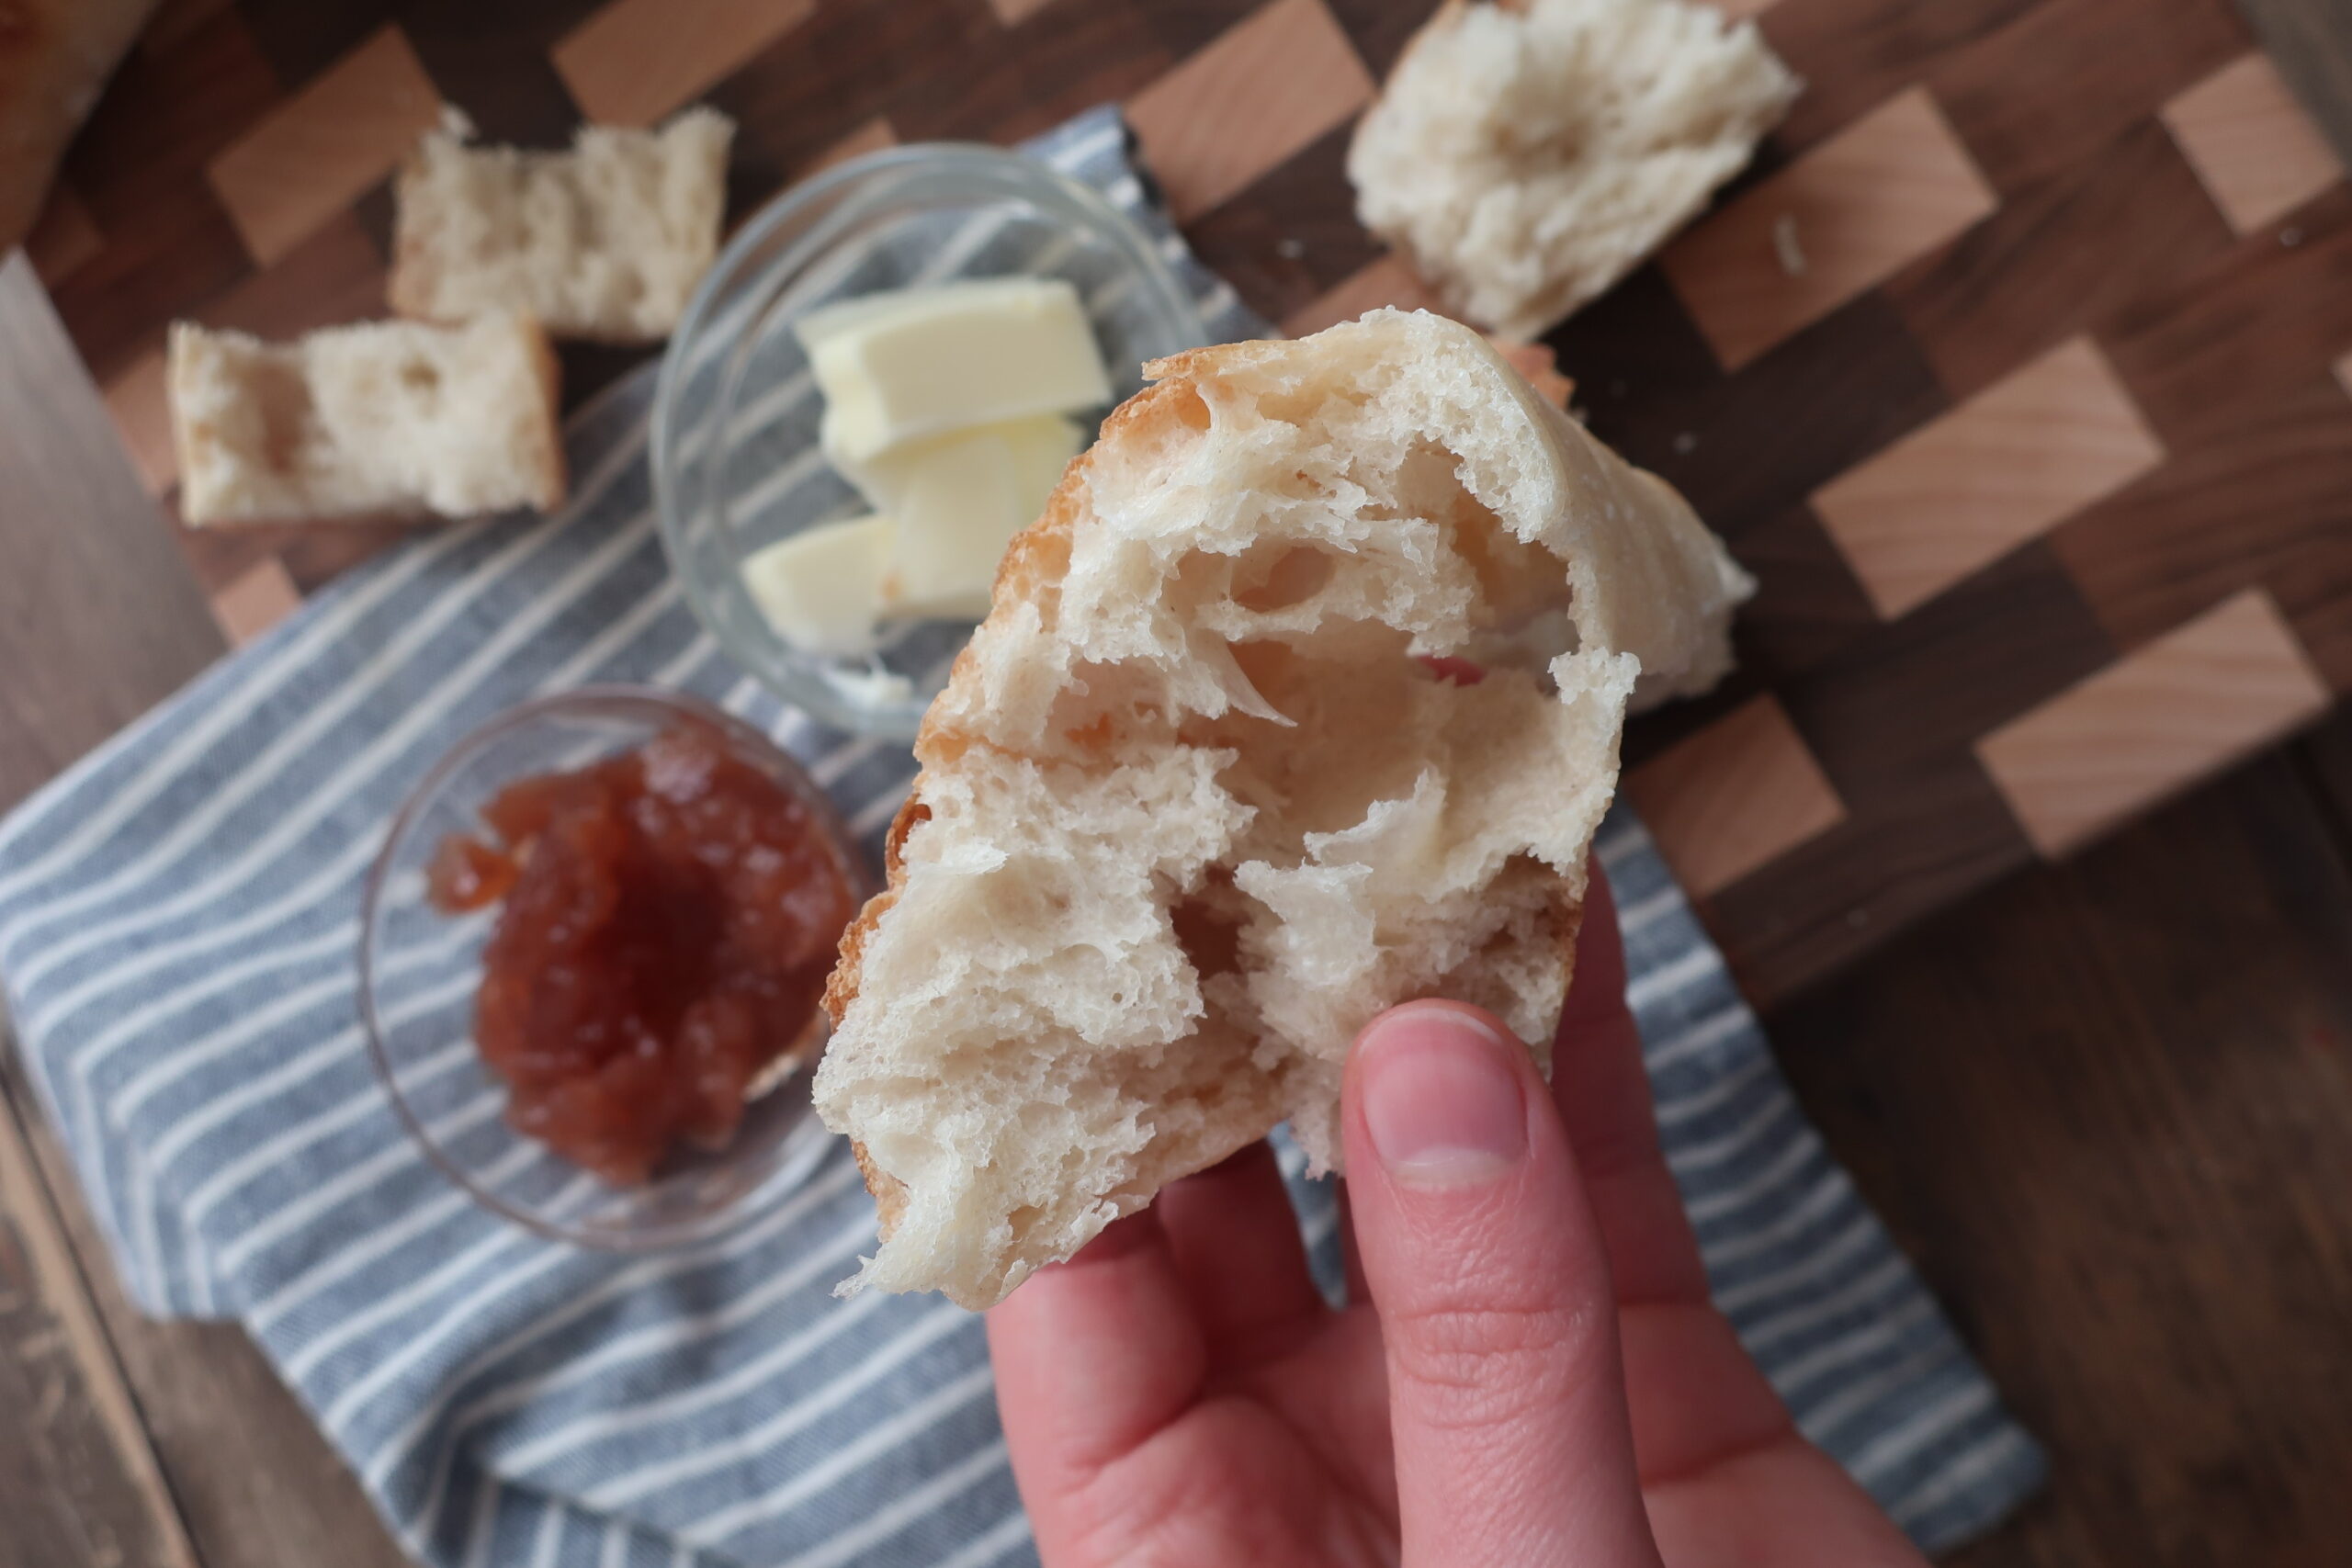
Remove the water, lower the oven to 390°F convection, and bake another seven minutes to brown the crust. Transfer the baguettes to a wire rack and cool at least 30 minutes before slicing.
3 reasons you’ll love these baguettes
TIPS & VARIATIONS
- Read the instructions before starting your baguettes! You will need to make your poolish the day before so it has time to ferment overnight.
- This is a great video to watch on the stretch and fold technique
- This yeast measurement is tiny. Unless you have a microscale you’re gonna have to feel your way through this one. If you’re working with fresh yeast, pinch and roll some between your fingers until it feels like you have two grains of rice between them. If you’re using dry yeast, pinch and roll some between your fingers until it feels like you have one grain of rice. I know, I know I said precision is key but for this… sometimes precision lies within the pinch.
- If you don’t have a clouche, don’t worry! You can still make the baguettes by using a kitchen towel.
- To get that artisanal pointed French baguette look. Once you’ve rolled each of your loaves out, roll the ends of each into a point with your hands.
HOW TO STORE FRENCH BAGUETTES
Like many breads, this French baguette is best the day it is made.
If you have leftovers, you can slice and store them in the freezer for the most optimal chance at freshness. Then remove a slice as desired and reheat in the toaster oven.
Additionally, you can revive the bread the next day by running the loaf under cold water. Yes, you read that right! And bake in a pre-heated 325°F oven for 15 minutes. Then remove the foil and pop back in the oven for another 5 minutes, to crisp up the crust. The water will help to provide steam and soften the bread for eating.
MORE BREAD RECIPES
- Blueberry Muffin Bread with Crumble Topping
- Spiced Challah Bread
- Cinnamon Sugar Sweet Potato Pull-Apart Bread
- No-Knead Focaccia with Two Separate Flavors: Pesto + Strawberry Cheesecake
- 4-Ingredient Bubble Bread
- Rosemary Challah Bread Rolls
EQUIPMENT YOU’LL NEED
- Mixer or Mixing Bowl
- Dough Hook Attachment (if using mixer)
- Kitchen Towels
- Couche (optional)
- Digital Scale
- Dough Scraper
- Parchment Paper
- Baking Tray
- Oven-proof Dish
- Bread Lame
- Cutting Board
- Wire Rack
Equipment
- Mixer with dough hook OR mixing bowl
- Kitchen towels (2 – for rising and couche)
- Digital Scale
- Dough Scraper
- Parchment Paper
- Baking Tray
- Oven proof dish
- Bread Lame
- Cutting Board (to transfer baguettes)
- Cooling rack
Ingredients
- 136 g Bread flour
- 136 g Water room temperature
- 0.18 g active dry yeast 0.36 fresh yeast
- 172 g Water room temperature
- 318 g Bread flour + extra for flouring surface when/if needed
- 272 g Poolish
- 10 g Water warm but not hot
- 2.8g g active dry yeast 5.6g fresh yeast
- 9 g Salt
Instructions
POOLISH
- Mix together all ingredients, ok if lumpy, and cover with a damp cloth. Let sit for 12-16 hours at room temperature.
BAGUETTES
- Mix together 172g of water and flour. You can use a mixer with a dough hook attachment or by hand. If done by hand, squish the mixture together until it forms a dough ball. Cover and let it sit for 30 mins.
- After 30 minutes, add poolish to your dough. Use a scraper to mix through as it will be messy. If doing by hand, grand and squeeze the dough. Combine until no more lumps.
- Once it’s no longer lumpy, keep mixing if using a dough hook. If doing it by hand, grab some of the dough and then stretch it over. Turning bowl and continuing. You’re ready to move on once the dough starts to “clean” the bowl. Aka there isn’t excess dough sticking to the edges or bottom of the bowl.
- In a small dish, stir together your 10g of water with your dough yeast and let it sit for five minutes.
- Once your dough is cleaning the bowl, add in the 10g water and squish it in. If using a mixer, mix for another minute or so until the dough and liquid aren’t sloshing around in the bowl.
- Dump the dough onto the counter (do not flour) and begin the stretch and fold method. See notes for a great video to watch on that technique. Slap the dough onto the counter, stretch it towards you, then backward to the top of the dough, stretching it wide, grab the dough and repeat.
- The key is to stretch the dough. You’re looking for the stage where the dough – aka the gluten within – is nice and stretchy and not tearing as you pull. There may be times when you need to use your dough scraper to bring it back together before returning to your stretch and fold process.
- Turn the dough over so the working side – the sticky side – is facing up. Add in your salt and dimple it in with your fingers. Fold and knead the dough until it is nice and smooth and the salt is completely incorporated.
- In a clean bowl, transfer the dough, smooth side up, cover with a damp cloth, and rest for 40 minutes.
- After the dough has rested, dampen your fingers and perform your four coil folds. Lift up the front end, stretch it up, and then tuck the top towards the center, underneath itself. Turn the bowl 180 degrees and repeat. Turn the bowl 90 degrees, and repeat. Turn the bowl 180 degrees, and repeat. When you’re done you should have coiled in all sides of the dough. Cover and rest for 30 minutes.
- After 30 minutes, do another round of coil folds. Then cover and rest the dough for 20 minutes.
- After 20 minutes, perform the final coil fold (coil #3), cover, and rest until the dough doubles in size. Depending on the warmth of your kitchen this will likely take at least 45 minutes.
- Once the dough has doubled in size, weigh it and divide by three to portion out three baguettes. Gently roll each dough portion into small balls. Leave it to rest uncovered for 15 minutes, to form a skin.
- Before you begin shaping your dough into baguettes, lay out your clouche or kitchen towel. If using a towel, lightly dust with flour (shake off any excess). With the cloth laying horizontally, lift up the back edge to create a crimp, this will form a back “gate” barrier for your first baguette.
- Working with one ball at a time, place the smooth side down and gently flatten it into a disc. Fold the top of the dough down to the center, press down, and the bottom of the dough up to the center, pressing down, forming a rectangle. You shouldn’t be pulling the dough. Repeat, folding the top of the dough to the center and the bottom of the dough to the center and pressing down on the seam after each fold. Then fold the top to the bottom and gently roll and extend the cylinder until the length of your baking tray.
- You can lightly flour your dough to roll it into a cylinder, if needed. Gently lift and place your dough on your couche cloth, seam side down, with the first crimp you made at the back. Once placed, make your next crimp so that there is a “gate” on both sides of your dough. Repeat the above shaping process, placing each baguette into the couche, with a crimp on either side, until you’ve finished all three. Be sure to pop out any air bubbles as you see them so you don’t have giant holes in your baguettes.
- Cover the dough and let sit for approx. one hour. To test if the dough is ready, lightly flour your finger and gently poke. If the indent slowly rises but not all the way, it’s ready for baking.
- Preheat your oven to as hot as it will go on the convection setting. Place an empty, heat-safe pot or dish at the bottom of your oven while it heats.
- In a pot or kettle, boil two to three cups of water.
- Gently pull your couche to separate each baguette dough from the other. Starting from the bottom, use a long board or cutting board and place it against the edge of one side of one baguette and then gently “flip” the baguette onto the board. Take it to your baking tray and in reverse, gently “flip” the baguette onto the far side of the baking sheet. You want the seam side down. Repeat until all baguettes are on one baking tray.
- Score your baguettes – this allows them to bloom as they bake – with short, two-inch lines straight down. You will probably get four to five scores on each baguette. The lines will almost overlap from one to the next.
- For this step you’ll need to move quickly so as to not lose any steam. Place your tray of baguettes on the third shelf down in your oven and then carefully pour a little over two cups of boiling water into your heat-safe pot at the bottom of the oven.
- Immediately close the oven door and bake for 10 minutes.
- Open the door, carefully remove the pan with water, AND drop the temperature to 390F convection. Bake for an additional seven minutes. This will brown your baguettes.
- Remove from oven and immediately transfer to a wire cooling rack. Cool for at least 30 minutes before cutting.